Compare commits
No commits in common. "fa31073482958d9f944878e5fe8e75b0ed42fb04" and "183eb20fd99cb3943567f05c082366c5a74e5e9d" have entirely different histories.
fa31073482
...
183eb20fd9
5
.gitignore
vendored
5
.gitignore
vendored
@ -130,8 +130,3 @@ dist
|
|||||||
.yarn/install-state.gz
|
.yarn/install-state.gz
|
||||||
.pnp.*
|
.pnp.*
|
||||||
|
|
||||||
csv_output/
|
|
||||||
output/
|
|
||||||
output.*
|
|
||||||
docments/
|
|
||||||
keys/
|
|
||||||
@ -1,7 +1,7 @@
|
|||||||
# js-common-code
|
# js-common-code
|
||||||
|
|
||||||
Javascriptで活用できるコードを開発する。
|
Javascriptで活用できるコードを開発する。
|
||||||
Node.jsによりサーバーサイドも作成
|
Node.jsによりサーバーサイドも作成する
|
||||||
|
|
||||||
|
|
||||||
|
|
||||||
|
|||||||
217
docs/archive.md
217
docs/archive.md
@ -1,217 +0,0 @@
|
|||||||
|
|
||||||
# [Node.js]ファイルをZIP圧縮してダウンロードする方法
|
|
||||||
|
|
||||||
- [\[Node.js\]ファイルをZIP圧縮してダウンロードする方法](#nodejsファイルをzip圧縮してダウンロードする方法)
|
|
||||||
- [圧縮処理について](#圧縮処理について)
|
|
||||||
- [方法1:フロンサイドで圧縮データを処理しファイルを保存する(JSZip)](#方法1フロンサイドで圧縮データを処理しファイルを保存するjszip)
|
|
||||||
- [方法2:サーバサイドで圧縮処理しファイルを出力する](#方法2サーバサイドで圧縮処理しファイルを出力する)
|
|
||||||
- [方法3:サーバサイドで圧縮処理しフロントでBlobによりファイルを取得する](#方法3サーバサイドで圧縮処理しフロントでblobによりファイルを取得する)
|
|
||||||
- [サンプルソース](#サンプルソース)
|
|
||||||
- [Blobを使用してZIPファイルを処理する(フロント側の処理)\*\*](#blobを使用してzipファイルを処理するフロント側の処理)
|
|
||||||
- [gcloudにあるファイルをzip形式でファイルを出力するサンプルソース](#gcloudにあるファイルをzip形式でファイルを出力するサンプルソース)
|
|
||||||
- [Zipダウンロードサーバを構築する(gcloud)](#zipダウンロードサーバを構築するgcloud)
|
|
||||||
|
|
||||||
|
|
||||||
## 圧縮処理について
|
|
||||||
|
|
||||||
* 方法1:フロンサイドで圧縮データを処理しファイルを保存する(JSZip)
|
|
||||||
* 方法2:サーバサイドで圧縮処理しファイルを出力する
|
|
||||||
* 方法3:サーバサイドで圧縮処理しフロントでBlobによりファイルを取得する
|
|
||||||
|
|
||||||
### 方法1:フロンサイドで圧縮データを処理しファイルを保存する(JSZip)
|
|
||||||
|
|
||||||
* **ファイル量が多い場合(30MB以上など)はサーバーサイドで処理するほうがいい**
|
|
||||||
* 大容量データの処理には向かない
|
|
||||||
* ユーザーのデバイスの性能に依存する
|
|
||||||
|
|
||||||
```mermaid
|
|
||||||
sequenceDiagram
|
|
||||||
User->>Front: ダウンロードボタンを要求する
|
|
||||||
loop ファイル毎に処理する
|
|
||||||
Front->>Storage: ファイルを要求する(fetch)
|
|
||||||
Storage-->>Front: ファイル情報を返す
|
|
||||||
end
|
|
||||||
Front-->>Front: Zip処理を実行する(JSZip)
|
|
||||||
Front-->>User: ダウンロード処理を実行する(blob)
|
|
||||||
```
|
|
||||||
|
|
||||||
* https://stuk.github.io/jszip/documentation/examples.html
|
|
||||||
* [サンプルコード](../src/front/assets/download.js)
|
|
||||||
|
|
||||||
```
|
|
||||||
import JSZip from "jszip";
|
|
||||||
```
|
|
||||||
|
|
||||||
**CDNでインポートする場合**
|
|
||||||
|
|
||||||
```js
|
|
||||||
<script src="https://cdnjs.cloudflare.com/ajax/libs/jszip/3.10.1/jszip.min.js"></script>
|
|
||||||
```
|
|
||||||
|
|
||||||
---
|
|
||||||
|
|
||||||
### 方法2:サーバサイドで圧縮処理しファイルを出力する
|
|
||||||
|
|
||||||
サーバーサイドでarchiverを使ってZIPを作成し、
|
|
||||||
一時ファイルとして保存してからダウンロード用のURLを返します
|
|
||||||
|
|
||||||
* archiverモジュールで実行する
|
|
||||||
* Zipファイルの保存のためにストレージが別で必要
|
|
||||||
* ライフサイクルを考慮しないと不要なファイルが溜まる
|
|
||||||
* 大容量データの圧縮に適してい
|
|
||||||
* 複数のリクエストに対応しやすい
|
|
||||||
|
|
||||||
|
|
||||||
```mermaid
|
|
||||||
sequenceDiagram
|
|
||||||
User->>Front: ダウンロードボタンを要求する
|
|
||||||
Front->>Server: ダウンロードを要求する
|
|
||||||
Server->>Storage: ファイルデータ取得API
|
|
||||||
Storage->>Server: レスポンス
|
|
||||||
Server->>Server: Zip処理を実行する(archiver)
|
|
||||||
Server->>Storage: 作成した Zipを保存する
|
|
||||||
Storage->>Server: レスポンス
|
|
||||||
Server-->>Front: ファイルのURLを返す
|
|
||||||
Front->>Storage: URLをリンクする(HTTP)
|
|
||||||
Storage-->>User: ファイルをダウンロードする
|
|
||||||
```
|
|
||||||
|
|
||||||
```sh
|
|
||||||
npm install archiver
|
|
||||||
```
|
|
||||||
---
|
|
||||||
|
|
||||||
### 方法3:サーバサイドで圧縮処理しフロントでBlobによりファイルを取得する
|
|
||||||
|
|
||||||
ZIPを一時ファイルとして保存せずに
|
|
||||||
直接フロントエンドにストリームとして送信します。
|
|
||||||
|
|
||||||
* archiverモジュールで実行する
|
|
||||||
* 保存せずにファイルコンテンツを返す
|
|
||||||
* リアルタイムでファイルをストリーミング可能
|
|
||||||
* ストレージの管理が不要
|
|
||||||
* クライアントがダウンロードを途中でキャンセルするとデータが失われる可能性がある
|
|
||||||
|
|
||||||
|
|
||||||
```mermaid
|
|
||||||
sequenceDiagram
|
|
||||||
User->>Front: ダウンロードボタンを要求する
|
|
||||||
Front->>Server: ダウンロードを要求する
|
|
||||||
Server->>Storage: ファイルデータ取得API
|
|
||||||
Storage->>Server: レスポンス
|
|
||||||
Server->>Server: Zip処理を実行する(archiver)
|
|
||||||
Storage->>Front: Zipされたファイルコンテンツを返す
|
|
||||||
Front-->>User: ダウンロード処理を実行する(blob)
|
|
||||||
```
|
|
||||||
|
|
||||||
## サンプルソース
|
|
||||||
|
|
||||||
### Blobを使用してZIPファイルを処理する(フロント側の処理)**
|
|
||||||
|
|
||||||
```js
|
|
||||||
fetch("https://example.com/sample.zip")
|
|
||||||
.then(response => response.blob())
|
|
||||||
.then(blob => {
|
|
||||||
const url = URL.createObjectURL(blob);
|
|
||||||
const a = document.createElement("a");
|
|
||||||
a.href = url;
|
|
||||||
a.download = "downloaded.zip";
|
|
||||||
document.body.appendChild(a);
|
|
||||||
a.click();
|
|
||||||
URL.revokeObjectURL(url);
|
|
||||||
})
|
|
||||||
.catch(error => console.error("Error downloading ZIP:", error));
|
|
||||||
```
|
|
||||||
|
|
||||||
|
|
||||||
#### gcloudにあるファイルをzip形式でファイルを出力するサンプルソース
|
|
||||||
(スクリプト)
|
|
||||||
|
|
||||||
```js
|
|
||||||
const { Storage } = require('@google-cloud/storage');
|
|
||||||
const archiver = require('archiver');
|
|
||||||
const fs = require('fs');
|
|
||||||
|
|
||||||
const storage = new Storage();
|
|
||||||
const bucketName = 'your-bucket-name';
|
|
||||||
const filesToDownload = ['file1.csv', 'file2.csv']; // 圧縮したいファイルリスト
|
|
||||||
const outputZip = 'output.zip';
|
|
||||||
|
|
||||||
async function downloadAndZip() {
|
|
||||||
const output = fs.createWriteStream(outputZip);
|
|
||||||
const archive = archiver('zip', { zlib: { level: 9 } });
|
|
||||||
|
|
||||||
output.on('close', () => {
|
|
||||||
console.log(`Zip file created: ${outputZip} (${archive.pointer()} bytes)`);
|
|
||||||
});
|
|
||||||
|
|
||||||
archive.pipe(output);
|
|
||||||
|
|
||||||
for (const fileName of filesToDownload) {
|
|
||||||
const file = storage.bucket(bucketName).file(fileName);
|
|
||||||
const [exists] = await file.exists();
|
|
||||||
|
|
||||||
if (exists) {
|
|
||||||
console.log(`Adding ${fileName} to archive...`);
|
|
||||||
archive.append(file.createReadStream(), { name: fileName });
|
|
||||||
} else {
|
|
||||||
console.warn(`File not found: ${fileName}`);
|
|
||||||
}
|
|
||||||
}
|
|
||||||
|
|
||||||
archive.finalize();
|
|
||||||
}
|
|
||||||
|
|
||||||
downloadAndZip().catch(console.error);
|
|
||||||
```
|
|
||||||
|
|
||||||
#### Zipダウンロードサーバを構築する(gcloud)
|
|
||||||
(サーバ)
|
|
||||||
|
|
||||||
```js
|
|
||||||
/**
|
|
||||||
* @fileoverview Google Cloud Storage (GCS) download module.
|
|
||||||
*/
|
|
||||||
const { Storage } = require('@google-cloud/storage');
|
|
||||||
const archiver = require('archiver');
|
|
||||||
const KEY_FILE_PATH = './keys/service-account.json'
|
|
||||||
const storage = new Storage({
|
|
||||||
keyFilename: KEY_FILE_PATH});
|
|
||||||
|
|
||||||
// Load environment variables
|
|
||||||
require('dotenv').config();
|
|
||||||
|
|
||||||
// バケット名を.envから取得する
|
|
||||||
const BUCKET_NAME = process.env.BUCKET_NAME;
|
|
||||||
console.log(`BUCKET_NAME: ${BUCKET_NAME}`);
|
|
||||||
|
|
||||||
|
|
||||||
/**
|
|
||||||
* GCStorageからファイルをダウンロードする
|
|
||||||
*
|
|
||||||
* @param {http.IncomingMessage} req
|
|
||||||
* @param {http.ServerResponse} res
|
|
||||||
*/
|
|
||||||
const downloadFilesFromGCS = async (req, res) => {
|
|
||||||
// バケットからファイル一覧を取得する
|
|
||||||
const [files] = await storage.bucket(BUCKET_NAME).getFiles();
|
|
||||||
const filesToZip = files.map((file) => file.name);
|
|
||||||
|
|
||||||
res.setHeader('Content-Disposition', 'attachment; filename="files.zip"');
|
|
||||||
res.setHeader('Content-Type', 'application/zip');
|
|
||||||
|
|
||||||
const archive = archiver('zip', { zlib: { level: 9 } });
|
|
||||||
|
|
||||||
archive.on('error', (err) => res.status(500).send({ error: err.message }));
|
|
||||||
archive.pipe(res);
|
|
||||||
|
|
||||||
|
|
||||||
for (const fileName of filesToZip) {
|
|
||||||
const file = storage.bucket(BUCKET_NAME).file(fileName);
|
|
||||||
archive.append(file.createReadStream(), { name: fileName });
|
|
||||||
}
|
|
||||||
archive.finalize();
|
|
||||||
};
|
|
||||||
module.exports = downloadFilesFromGCS;
|
|
||||||
```
|
|
||||||
|
|
||||||
@ -1,138 +0,0 @@
|
|||||||
# [GCP][GCS]Node.jsライブラリでストレージを活用する
|
|
||||||
|
|
||||||
Node.jsのライブラリを使いストレージを制御します
|
|
||||||
|
|
||||||
## GCSとの連携について
|
|
||||||
|
|
||||||
セキュリティやアクセス制御の観点から、
|
|
||||||
フロントエンドは直接Cloud Storageにアクセスせず
|
|
||||||
サーバー経由で取得するのが一般的です
|
|
||||||
|
|
||||||
ただし静的なファイルや公開データであれば
|
|
||||||
フロントエンドから直接Cloud Storageにアクセスすることもあります
|
|
||||||
|
|
||||||
## ライブラリのインストール
|
|
||||||
|
|
||||||
```sh
|
|
||||||
npm install --save @google-cloud/storage
|
|
||||||
```
|
|
||||||
|
|
||||||
## GCS接続
|
|
||||||
|
|
||||||
```js
|
|
||||||
const { Storage } = require('@google-cloud/storage');
|
|
||||||
```
|
|
||||||
|
|
||||||
**サービスアカウントを環境変数で設定する場合**
|
|
||||||
|
|
||||||
```sh
|
|
||||||
export GOOGLE_APPLICATION_CREDENTIALS="/path/to/service-account.json"
|
|
||||||
```
|
|
||||||
|
|
||||||
```js
|
|
||||||
const storage = new Storage()
|
|
||||||
```
|
|
||||||
|
|
||||||
**JSONキーファイルをソースで読み込む場合**
|
|
||||||
|
|
||||||
```js
|
|
||||||
const KEY_FILE_PATH = './keys/service-account.json'
|
|
||||||
|
|
||||||
const storage = new Storage({
|
|
||||||
keyFilename: KEY_FILE_PATH});
|
|
||||||
```
|
|
||||||
|
|
||||||
**JSONキーファイルを使わず直接設定**
|
|
||||||
|
|
||||||
```js
|
|
||||||
const serviceAccount = {
|
|
||||||
type: "service_account",
|
|
||||||
project_id: "your-project-id",
|
|
||||||
private_key_id: "your-private-key-id",
|
|
||||||
private_key: "-----BEGIN PRIVATE KEY-----\nYOUR-PRIVATE-KEY\n-----END PRIVATE KEY-----\n",
|
|
||||||
client_email: "your-service-account@your-project-id.iam.gserviceaccount.com",
|
|
||||||
client_id: "your-client-id",
|
|
||||||
auth_uri: "https://accounts.google.com/o/oauth2/auth",
|
|
||||||
token_uri: "https://oauth2.googleapis.com/token",
|
|
||||||
auth_provider_x509_cert_url: "https://www.googleapis.com/oauth2/v1/certs",
|
|
||||||
client_x509_cert_url: "https://www.googleapis.com/robot/v1/metadata/x509/your-service-account"
|
|
||||||
};
|
|
||||||
const storage = new Storage({ credentials: serviceAccount });
|
|
||||||
```
|
|
||||||
|
|
||||||
## 権限について
|
|
||||||
|
|
||||||
* ストレージ管理者
|
|
||||||
*
|
|
||||||
* 環境とストレージ オブジェクト閲覧者
|
|
||||||
* Storage オブジェクト閲覧者
|
|
||||||
* ストレージ フォルダ管理者
|
|
||||||
|
|
||||||
## サンプルコード
|
|
||||||
|
|
||||||
### バケット一覧を取得する
|
|
||||||
|
|
||||||
```js
|
|
||||||
/**
|
|
||||||
* バケット一覧を取得する
|
|
||||||
*/
|
|
||||||
async function listBuckets() {
|
|
||||||
const [buckets] = await storage.getBuckets();
|
|
||||||
|
|
||||||
console.log('Buckets:');
|
|
||||||
buckets.forEach(bucket => {
|
|
||||||
console.log(bucket.name);
|
|
||||||
});
|
|
||||||
}
|
|
||||||
```
|
|
||||||
|
|
||||||
ファイル検索については以下のページを参照してください
|
|
||||||
[[GCP]Google Cloud Storageでパターンにマッチしたファイル一覧を取得する](https://wiki.pglikers.com/en/private/cloud/gcp/gcs/glob)
|
|
||||||
|
|
||||||
|
|
||||||
|
|
||||||
### バケットの中のファイル一覧を取得する
|
|
||||||
|
|
||||||
```js
|
|
||||||
async function listFiles(bucketName) {
|
|
||||||
const [files] = await storage.bucket(bucketName).getFiles();
|
|
||||||
|
|
||||||
console.log(`Files in ${bucketName}:`);
|
|
||||||
files.forEach(file => {
|
|
||||||
console.log(file.name);
|
|
||||||
});
|
|
||||||
}
|
|
||||||
```
|
|
||||||
|
|
||||||
### 署名付きURLを発行する
|
|
||||||
|
|
||||||
```js
|
|
||||||
/**
|
|
||||||
* 署名付きURLを生成する
|
|
||||||
*/
|
|
||||||
const generateV4ReadSignedUrl = async (bucketName, fileName) => {
|
|
||||||
const options = {
|
|
||||||
version: 'v4',
|
|
||||||
action: 'read',
|
|
||||||
expires: Date.now() + 15 * 60 * 1000, // 15 minutes
|
|
||||||
};
|
|
||||||
const [url] = await storage.bucket(bucketName).file(fileName).getSignedUrl(options);
|
|
||||||
console.log(`Generated GET signed URL:`);
|
|
||||||
console.log(url);
|
|
||||||
return url;
|
|
||||||
}
|
|
||||||
```
|
|
||||||
|
|
||||||
### ファイルをダウンロードする
|
|
||||||
|
|
||||||
```js
|
|
||||||
// ファイルのコンテンツをダウンロードする
|
|
||||||
const downloadFile = async () => {
|
|
||||||
const options = {
|
|
||||||
destination: path.join(__dirname, FILE_NAME)
|
|
||||||
};
|
|
||||||
await storage.bucket(BUCKET_NAME).file(FILE_NAME).download(options);
|
|
||||||
// 取得したファイルのコンテンツからファイルを生成する
|
|
||||||
console.log(`Downloaded ${FILE_NAME}`);
|
|
||||||
};
|
|
||||||
```
|
|
||||||
@ -1,56 +0,0 @@
|
|||||||
|
|
||||||
# [GCP][GCS]ファイルのライフサイクルと運用について
|
|
||||||
|
|
||||||
* [[GCP]Google Cloud Storageを活用する・静的ファイルをデプロイする方法](https://wiki.pglikers.com/en/private/cloud/gcp/gcs/hosting)
|
|
||||||
|
|
||||||
## Bucketのファイルにライフサイクルを設定する
|
|
||||||
|
|
||||||
- **活用できるユースケース**
|
|
||||||
- ○○日経過にファイルを削除する
|
|
||||||
|
|
||||||
[公式ドキュメント](https://cloud.google.com/storage/docs/lifecycle?hl=ja)
|
|
||||||
|
|
||||||
### GUIでの設定
|
|
||||||
|
|
||||||
1. Google Cloudコンソールで、Cloud Storageの[バケット]を開く
|
|
||||||
* https://console.cloud.google.com/storage/browser?hl=ja
|
|
||||||
2. 対象のBucketを開く
|
|
||||||
3. `ライフサイクル`タブを押下する
|
|
||||||
4. ルールを追加する
|
|
||||||
|
|
||||||
### コマンドで設定する場合
|
|
||||||
|
|
||||||
#### 1. 構成ファイルを作成する
|
|
||||||
|
|
||||||
1日経過後に削除する場合の構成
|
|
||||||
[(構成についてはこちら)](https://cloud.google.com/storage/docs/lifecycle-configurations?hl=ja)
|
|
||||||
|
|
||||||
```json
|
|
||||||
{
|
|
||||||
"lifecycle": {
|
|
||||||
"rule": [
|
|
||||||
{
|
|
||||||
"action": { "type": "Delete" },
|
|
||||||
"condition": {
|
|
||||||
"age": 1
|
|
||||||
}
|
|
||||||
}
|
|
||||||
]
|
|
||||||
}
|
|
||||||
}
|
|
||||||
```
|
|
||||||
|
|
||||||
#### 2. ライフサイクル構成を設定する
|
|
||||||
|
|
||||||
```sh
|
|
||||||
cloud storage buckets update gs://BUCKET_NAME \
|
|
||||||
--lifecycle-file=LIFECYCLE_CONFIG_FILE
|
|
||||||
```
|
|
||||||
|
|
||||||
- LIFECYCLE_CONFIG_FILEは、作成したJSONファイルのパスです
|
|
||||||
|
|
||||||
#### ライフサイクル構成を削除する場合のコマンド
|
|
||||||
|
|
||||||
```sh
|
|
||||||
gcloud storage buckets update gs://BUCKET_NAME --clear-lifecycle
|
|
||||||
```
|
|
||||||
@ -1,86 +0,0 @@
|
|||||||
# [Node.js]NodeでHttpサーバーを起動及び構築する方法
|
|
||||||
|
|
||||||
## `http-server`を使う場合
|
|
||||||
|
|
||||||
http-serverはNode.js のシンプルな静的ファイルサーバーです。
|
|
||||||
インストールすれば簡単にローカルでファイルをホスティングできます。
|
|
||||||
|
|
||||||
```sh
|
|
||||||
# http-server をグローバルインストール(初回のみ)
|
|
||||||
npm install -g http-server
|
|
||||||
|
|
||||||
# ファイルがあるディレクトリへ移動
|
|
||||||
cd src/front
|
|
||||||
|
|
||||||
# サーバー起動(デフォルトは http://localhost:8080)
|
|
||||||
http-server
|
|
||||||
# http-server -p 3000
|
|
||||||
```
|
|
||||||
|
|
||||||
## `http`モジュールを使う場合
|
|
||||||
|
|
||||||
* Node.jsの標準機能なので追加ライブラリなしで動作
|
|
||||||
* 軽量でシンプルな HTTPサーバーをすぐ作れる
|
|
||||||
* ルーティング機能がなく、URLごとに手動で条件分岐が必要
|
|
||||||
* ミドルウェア機能(ログ・認証・エラーハンドリング)がない
|
|
||||||
* 中~大規模開発には向かない(Expressのほうが便利)
|
|
||||||
|
|
||||||
|
|
||||||
```js
|
|
||||||
const http = require('http'); // httpモジュールをインポート
|
|
||||||
|
|
||||||
// サーバーを作成
|
|
||||||
const httpserver = http.createServer((req, res) => {
|
|
||||||
res.writeHead(200, { 'Content-Type': 'text/plain' }); // HTTPステータス 200 とヘッダーを設定
|
|
||||||
res.end('Hello, Node.js Server!'); // クライアントへレスポンスを送信
|
|
||||||
});
|
|
||||||
|
|
||||||
// ポート3000でサーバーを起動
|
|
||||||
httpserver.listen(3000, () => {
|
|
||||||
console.log('Server running at http://localhost:3000');
|
|
||||||
});
|
|
||||||
```
|
|
||||||
|
|
||||||
|
|
||||||
## `Express`を使う場合
|
|
||||||
|
|
||||||
xpressはNode.jsの主要なWebフレームワークで
|
|
||||||
APIサーバーや動的ページの生成にも対応できます。
|
|
||||||
|
|
||||||
### インストール方法
|
|
||||||
|
|
||||||
```sh
|
|
||||||
# プロジェクトフォルダを作成して移動
|
|
||||||
mkdir sample-express-app && cd sample-express-app
|
|
||||||
# npm 初期化
|
|
||||||
npm init -y
|
|
||||||
# Express インストール
|
|
||||||
npm install express
|
|
||||||
|
|
||||||
# `server.js` を作成して、以下を記述
|
|
||||||
node server.js
|
|
||||||
```
|
|
||||||
|
|
||||||
### サーバースクリプト
|
|
||||||
|
|
||||||
`server.js`を作成する
|
|
||||||
|
|
||||||
```js
|
|
||||||
// server.js
|
|
||||||
const express = require('express');
|
|
||||||
const app = express();
|
|
||||||
const port = 3000;
|
|
||||||
|
|
||||||
// 静的ファイルを提供
|
|
||||||
app.use(express.static('public'));
|
|
||||||
|
|
||||||
// ルートエンドポイント
|
|
||||||
app.get('/', (req, res) => {
|
|
||||||
res.send('Hello, Express!');
|
|
||||||
});
|
|
||||||
|
|
||||||
// サーバー起動
|
|
||||||
app.listen(port, () => {
|
|
||||||
console.log(`Server running at http://localhost:${port}`);
|
|
||||||
});
|
|
||||||
```
|
|
||||||
130
docs/jsDoc.md
130
docs/jsDoc.md
@ -1,130 +0,0 @@
|
|||||||
# [Javascript][JSDoc]ドキュメントを自動生成する(TypeScript対応)
|
|
||||||
|
|
||||||
* JSDocコメントの有効活用
|
|
||||||
* JavaScriptやTypeScriptのドキュメントを生成する方法
|
|
||||||
|
|
||||||
- [\[Javascript\]\[JSDoc\]ドキュメントを自動生成する(TypeScript対応)](#javascriptjsdocドキュメントを自動生成するtypescript対応)
|
|
||||||
- [インストール方法](#インストール方法)
|
|
||||||
- [packeage.jsonの設定](#packeagejsonの設定)
|
|
||||||
- [TypeScriptの場合](#typescriptの場合)
|
|
||||||
- [書き方について](#書き方について)
|
|
||||||
- [ファイルを出力する](#ファイルを出力する)
|
|
||||||
- [1つの対象ファイルを出力する](#1つの対象ファイルを出力する)
|
|
||||||
- [markdownで出力する場合](#markdownで出力する場合)
|
|
||||||
- [HTMLで出力する場合](#htmlで出力する場合)
|
|
||||||
|
|
||||||
|
|
||||||
## インストール方法
|
|
||||||
|
|
||||||
```sh
|
|
||||||
npm install jsdoc -D
|
|
||||||
```
|
|
||||||
|
|
||||||
### packeage.jsonの設定
|
|
||||||
|
|
||||||
スクリプトを記載する
|
|
||||||
`-r`オプションを用いて、出力させたい対象のフォルダーを指定します
|
|
||||||
|
|
||||||
```json
|
|
||||||
{
|
|
||||||
"scripts": {
|
|
||||||
"doc": "jsdoc -r src"
|
|
||||||
}
|
|
||||||
}
|
|
||||||
```
|
|
||||||
|
|
||||||
### TypeScriptの場合
|
|
||||||
|
|
||||||
インストール方法
|
|
||||||
|
|
||||||
```sh
|
|
||||||
npm install typedoc -D
|
|
||||||
```
|
|
||||||
packeage.jsonの設定
|
|
||||||
|
|
||||||
```json
|
|
||||||
{
|
|
||||||
"scripts": {
|
|
||||||
"doc": "typedoc --entryPointStrategy expand ./src"
|
|
||||||
}
|
|
||||||
}
|
|
||||||
```
|
|
||||||
|
|
||||||
tsconfig.jsonファイルの設定
|
|
||||||
|
|
||||||
```json
|
|
||||||
{
|
|
||||||
"compilerOptions": {
|
|
||||||
"module": "ESNext",
|
|
||||||
"target": "ESNext",
|
|
||||||
"sourceMap": true,
|
|
||||||
"strict": true
|
|
||||||
},
|
|
||||||
"exclude": [
|
|
||||||
"node_modules"
|
|
||||||
]
|
|
||||||
}
|
|
||||||
```
|
|
||||||
|
|
||||||
## 書き方について
|
|
||||||
|
|
||||||
JSDocはJavascriptのコメントルールです
|
|
||||||
VSCodeとの相性が良い。プラグインなしで自動で生成できる
|
|
||||||
|
|
||||||
* コメントが必要なところで`/**`を入力すると自動的に生成される
|
|
||||||
* autocompleteが自動に表示しますので、`Enter`を入力する
|
|
||||||
|
|
||||||
```js
|
|
||||||
/**
|
|
||||||
```
|
|
||||||
|
|
||||||
## ファイルを出力する
|
|
||||||
|
|
||||||
### 1つの対象ファイルを出力する
|
|
||||||
|
|
||||||
#### markdownで出力する場合
|
|
||||||
|
|
||||||
**markdownのモジュールをインストール**
|
|
||||||
|
|
||||||
```sh
|
|
||||||
npm install -g jsdoc-to-markdown
|
|
||||||
```
|
|
||||||
|
|
||||||
**ファイルを出力する**
|
|
||||||
|
|
||||||
```sh
|
|
||||||
npx jsdoc-to-markdown your-file.js > output.md
|
|
||||||
# npx jsdoc-to-markdown src/script/sampleScript.js > output.md
|
|
||||||
```
|
|
||||||
|
|
||||||
#### HTMLで出力する場合
|
|
||||||
|
|
||||||
**ファイルを直接指定する場合**
|
|
||||||
|
|
||||||
```sh
|
|
||||||
jsdoc your-file.js -d doc
|
|
||||||
# jsdoc src/script/sampleScript.js -d docments
|
|
||||||
```
|
|
||||||
|
|
||||||
**設定ファイルを仕様する場合**
|
|
||||||
|
|
||||||
|
|
||||||
`jsdoc.json`を生成する
|
|
||||||
|
|
||||||
```json
|
|
||||||
{
|
|
||||||
"source": {
|
|
||||||
"include": ["src/script/sampleScript.js"]
|
|
||||||
},
|
|
||||||
"opts": {
|
|
||||||
"destination": "./docments"
|
|
||||||
}
|
|
||||||
}
|
|
||||||
```
|
|
||||||
|
|
||||||
**ファイルを出力する**
|
|
||||||
|
|
||||||
```sh
|
|
||||||
jsdoc -c jsdoc.json
|
|
||||||
```
|
|
||||||
|
|
||||||
319
docs/mermaid.md
319
docs/mermaid.md
@ -1,319 +0,0 @@
|
|||||||
# 【Mermaid】概要及び基本的な使い方
|
|
||||||
|
|
||||||
- [【Mermaid】概要及び基本的な使い方](#mermaid概要及び基本的な使い方)
|
|
||||||
- [各図形の基本的な書き方](#各図形の基本的な書き方)
|
|
||||||
- [フローチャート図](#フローチャート図)
|
|
||||||
- [シーケンス図](#シーケンス図)
|
|
||||||
- [クラス図](#クラス図)
|
|
||||||
- [ER図(データ概念図 CDMD)](#er図データ概念図-cdmd)
|
|
||||||
- [アーキテクチャ図](#アーキテクチャ図)
|
|
||||||
- [ガントチャート](#ガントチャート)
|
|
||||||
- [図形の設定について](#図形の設定について)
|
|
||||||
- [テーマの設定](#テーマの設定)
|
|
||||||
- [Tips](#tips)
|
|
||||||
- [VSCodeにスぺニットを設定する(シーケンス図)](#vscodeにスぺニットを設定するシーケンス図)
|
|
||||||
|
|
||||||
|
|
||||||
**(参考リンク)**
|
|
||||||
* [公式サイト](https://mermaid.js.org/intro/)
|
|
||||||
* [公式 WEB Editor](https://mermaid.live/edit#p)
|
|
||||||
* [notepm-Mermaid記法の書き方](https://help.notepm.jp/hc/ja/articles/17267311368729-Mermaid%E8%A8%98%E6%B3%95%E3%81%AE%E6%9B%B8%E3%81%8D%E6%96%B9-Markdown%E3%83%86%E3%82%AD%E3%82%B9%E3%83%88%E3%81%A7%E3%83%81%E3%83%A3%E3%83%BC%E3%83%88-%E3%82%B0%E3%83%A9%E3%83%95%E3%81%8C%E6%8F%8F%E3%81%91%E3%82%8B-
|
|
||||||
)
|
|
||||||
|
|
||||||
Mermaidが対応していないコンテンツでも公式サイトのエディタを
|
|
||||||
活用することで図形をリンクさせることが可能です
|
|
||||||
|
|
||||||
---
|
|
||||||
|
|
||||||
## 各図形の基本的な書き方
|
|
||||||
|
|
||||||
### フローチャート図
|
|
||||||
|
|
||||||
````
|
|
||||||
```mermaid
|
|
||||||
flowchart TD
|
|
||||||
A[Christmas] -->|Get money| B(Go shopping)
|
|
||||||
B --> C{Let me think}
|
|
||||||
C -->|One| D[Laptop]
|
|
||||||
C -->|Two| E[iPhone]
|
|
||||||
C -->|Three| F[fa:fa-car Car]
|
|
||||||
```
|
|
||||||
````
|
|
||||||
|
|
||||||
```mermaid
|
|
||||||
flowchart TD
|
|
||||||
A[Christmas] -->|Get money| B(Go shopping)
|
|
||||||
B --> C{Let me think}
|
|
||||||
C -->|One| D[Laptop]
|
|
||||||
C -->|Two| E[iPhone]
|
|
||||||
C -->|Three| F[fa:fa-car Car]
|
|
||||||
```
|
|
||||||
|
|
||||||
### シーケンス図
|
|
||||||
|
|
||||||
* **古いバージョンではactor、participantが対応していない**
|
|
||||||
|
|
||||||
````
|
|
||||||
```mermaid
|
|
||||||
sequenceDiagram
|
|
||||||
actor User
|
|
||||||
participant Front
|
|
||||||
participant Server
|
|
||||||
User->>Front: URLをリンクする
|
|
||||||
Front-->>User: 一覧画面を表示する
|
|
||||||
User->>Front: 検索する
|
|
||||||
loop 対象商品
|
|
||||||
Front->>Server: 商品情報を取得する
|
|
||||||
Server-->>Front: レスポンス
|
|
||||||
end
|
|
||||||
Front-->>User: 検索結果を表示する
|
|
||||||
Note right of Front: Product Find <br/>sequence
|
|
||||||
```
|
|
||||||
````
|
|
||||||
|
|
||||||
[](https://mermaid.live/edit#pako:eNptkU9LwzAYxr9KyHnFe5GexJOKOHaRXmKTbYU1qVkiyBi4Fr14UPyLsIkbQ0WEMVRwCvsysev8FqatpYi7Je_7e9734X1a0GGYQBM2ya4k1CErLqpx5NncpgAgRzAOKk3Cs7-PuHAd10dUgFXOqPhfLhO-l-GJzLCslDNBZWtNBWcqfFLhiwpGqnOjguMES_uGBhPeBF_vB_P7h_ji87s30IJ5_zEefhT036GzYTd-HRTdBmM-iEbT-bgfXR5F551igWVlzkyQdWbhYXQ31huik6toel3MyDCjWKLCZxVMVNhLnU8ShlC8wHrmJn47nd12F1jfYIIA7tbqArAq-B2-yRmWjr6mSzFY3uFLVh5EIoEl6BHuIRfrhFrJqW0o6sQjNjT1E5Mqkg1hQ5u2NYqkYOV96kBTcElKUPoYiTxQaFZRo6mrBLs61PUs9TT8EuRM1uq5TMe4zVguaP8AZJXvtw)
|
|
||||||
|
|
||||||
APIのサンプル例
|
|
||||||
|
|
||||||
```mermaid
|
|
||||||
sequenceDiagram
|
|
||||||
App ->> API: request
|
|
||||||
alt OK
|
|
||||||
API -->> App: 200
|
|
||||||
else error
|
|
||||||
API -->> App: 400
|
|
||||||
end
|
|
||||||
```
|
|
||||||
|
|
||||||
### クラス図
|
|
||||||
|
|
||||||
````
|
|
||||||
```mermaid
|
|
||||||
classDiagram
|
|
||||||
Animal <|-- Duck
|
|
||||||
Animal <|-- Zebra
|
|
||||||
Animal : +int age
|
|
||||||
Animal : +String gender
|
|
||||||
Animal: +mate()
|
|
||||||
class Duck{
|
|
||||||
+String beakColor
|
|
||||||
+swim()
|
|
||||||
+quack()
|
|
||||||
}
|
|
||||||
class Zebra{
|
|
||||||
+bool is_wild
|
|
||||||
+run()
|
|
||||||
}
|
|
||||||
```
|
|
||||||
````
|
|
||||||
|
|
||||||
```mermaid
|
|
||||||
classDiagram
|
|
||||||
Animal <|-- Duck
|
|
||||||
Animal <|-- Zebra
|
|
||||||
Animal : +int age
|
|
||||||
Animal : +String gender
|
|
||||||
Animal: +mate()
|
|
||||||
class Duck{
|
|
||||||
+String beakColor
|
|
||||||
+swim()
|
|
||||||
+quack()
|
|
||||||
}
|
|
||||||
class Zebra{
|
|
||||||
+bool is_wild
|
|
||||||
+run()
|
|
||||||
}
|
|
||||||
```
|
|
||||||
|
|
||||||
### ER図(データ概念図 CDMD)
|
|
||||||
|
|
||||||
データベースのスキーマを表現したりするのに使われるER図です
|
|
||||||
「概念データモデル(CDM: Conceptual Data Model)」
|
|
||||||
|
|
||||||
````
|
|
||||||
```mermaid
|
|
||||||
erDiagram
|
|
||||||
CUSTOMER ||--o{ ORDER : places
|
|
||||||
ORDER ||--|{ LINE-ITEM : contains
|
|
||||||
CUSTOMER }|..|{ DELIVERY-ADDRESS : uses
|
|
||||||
```
|
|
||||||
````
|
|
||||||
|
|
||||||
```mermaid
|
|
||||||
erDiagram
|
|
||||||
CUSTOMER ||--o{ ORDER : places
|
|
||||||
ORDER ||--|{ LINE-ITEM : contains
|
|
||||||
CUSTOMER }|..|{ DELIVERY-ADDRESS : uses
|
|
||||||
```
|
|
||||||
|
|
||||||
(リレーション用のsymbol)
|
|
||||||
* `||--||` : 1対1 (One to One)
|
|
||||||
* `}o--||` : 多対1 (Many to One)
|
|
||||||
* `o{--||` : 1対多 (One to Many)
|
|
||||||
* `}o--o{` : 多対多 (Many to Many)
|
|
||||||
|
|
||||||
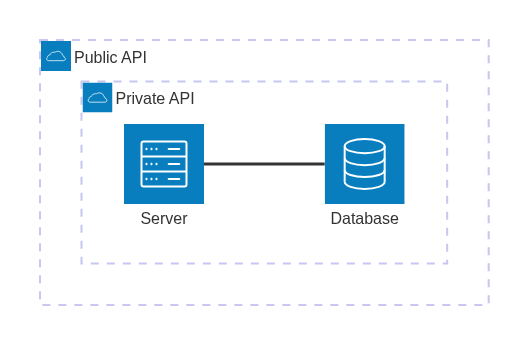
### アーキテクチャ図
|
|
||||||
|
|
||||||
**古いバージョンではアーキテクチャ図が対応していない**
|
|
||||||
|
|
||||||
````
|
|
||||||
```mermaid
|
|
||||||
architecture-beta
|
|
||||||
group public_api(cloud)[Public API]
|
|
||||||
group private_api(cloud)[Private API] in public_api
|
|
||||||
service database(database)[Database] in private_api
|
|
||||||
service server(server)[Server] in private_api
|
|
||||||
|
|
||||||
server:R -- L:database
|
|
||||||
```
|
|
||||||
````
|
|
||||||
|
|
||||||
[](https://mermaid.live/edit#pako:eNptkMFqwzAQRH9F7MkG-wd0K-RSaCE0t1qlrKWNLbAlsZYCJeTfK9sVTUN12WH1ZhbmCtobAgnIerSRdExMbU8RFSsn8hvYpyBC6ierPzHYSk8-mbo7bhvxdHz-eEDZXjDSH3ZfbbCw7i6tWBfii9UkDEbscaGqiLo7_Kjd-Rv-aF0ncbWPujtt8z_TvZFYvom2FS-yHFx_oYGZeEZrcjPXlVYQR5pJgczS0BnTFBUod8sopuhPX06DjJyogRRyFh0sDoxzWZKx0fPrXvbWeQO5rmEsQED37n3mzzgtdPsG-VmP1Q)
|
|
||||||
|
|
||||||
### ガントチャート
|
|
||||||
|
|
||||||
````
|
|
||||||
```mermaid
|
|
||||||
gantt
|
|
||||||
title work
|
|
||||||
dateFormat YYYY-MM-DD
|
|
||||||
section work_A
|
|
||||||
準備 :a1 ,2023-08-12 ,1d
|
|
||||||
作業 :a2 ,2023-08-14 ,2d
|
|
||||||
リリース :a3 ,after a2 ,1d
|
|
||||||
|
|
||||||
section work_B
|
|
||||||
準備 :b1 ,after a2 ,1d
|
|
||||||
作業_1 :b2 ,after b1 ,3d
|
|
||||||
作業_2 :b3 ,after b1 ,2d
|
|
||||||
リリース :b4 ,after b2 ,1d
|
|
||||||
```
|
|
||||||
````
|
|
||||||
|
|
||||||
|
|
||||||
```mermaid
|
|
||||||
gantt
|
|
||||||
title work
|
|
||||||
dateFormat YYYY-MM-DD
|
|
||||||
section work_A
|
|
||||||
準備 :a1 ,2023-08-12 ,1d
|
|
||||||
作業 :a2 ,2023-08-14 ,2d
|
|
||||||
リリース :a3 ,after a2 ,1d
|
|
||||||
|
|
||||||
section work_B
|
|
||||||
準備 :b1 ,after a2 ,1d
|
|
||||||
作業_1 :b2 ,after b1 ,3d
|
|
||||||
作業_2 :b3 ,after b1 ,2d
|
|
||||||
リリース :b4 ,after b2 ,1d
|
|
||||||
```
|
|
||||||
|
|
||||||
## 図形の設定について
|
|
||||||
|
|
||||||
### テーマの設定
|
|
||||||
|
|
||||||
**参考記事:**
|
|
||||||
* [zenn-Mermaid のテーマ・スタイルの変更方法](https://zenn.dev/junkawa/articles/zenn-mermaidjs-theme-config)
|
|
||||||
|
|
||||||
|
|
||||||
|
|
||||||
```sh
|
|
||||||
%%{init:{'theme':'base'}}%%
|
|
||||||
```
|
|
||||||
|
|
||||||
**default**
|
|
||||||
|
|
||||||
設定しない場合もこのスタイルになります
|
|
||||||
|
|
||||||
```mermaid
|
|
||||||
%%{init:{'theme':'default'}}%%
|
|
||||||
graph LR
|
|
||||||
q(QEMU) --> qemu-boot-shim --> physboot --> zircon
|
|
||||||
```
|
|
||||||
|
|
||||||
**base**
|
|
||||||
|
|
||||||
```mermaid
|
|
||||||
%%{init:{'theme':'base'}}%%
|
|
||||||
graph LR
|
|
||||||
q(QEMU) --> qemu-boot-shim --> physboot --> zircon
|
|
||||||
```
|
|
||||||
|
|
||||||
**forest**
|
|
||||||
|
|
||||||
```mermaid
|
|
||||||
%%{init:{'theme':'forest'}}%%
|
|
||||||
graph LR
|
|
||||||
q(QEMU) --> qemu-boot-shim --> physboot --> zircon
|
|
||||||
```
|
|
||||||
|
|
||||||
**dark**
|
|
||||||
|
|
||||||
```mermaid
|
|
||||||
%%{init:{'theme':'dark'}}%%
|
|
||||||
graph LR
|
|
||||||
q(QEMU) --> qemu-boot-shim --> physboot --> zircon
|
|
||||||
```
|
|
||||||
|
|
||||||
**neutral**
|
|
||||||
|
|
||||||
```mermaid
|
|
||||||
%%{init:{'theme':'neutral'}}%%
|
|
||||||
graph LR
|
|
||||||
q(QEMU) --> qemu-boot-shim --> physboot --> zircon
|
|
||||||
```
|
|
||||||
|
|
||||||
## Tips
|
|
||||||
|
|
||||||
### VSCodeにスぺニットを設定する(シーケンス図)
|
|
||||||
|
|
||||||
1. [Ctrl] + [Shift] + [P]を入力する
|
|
||||||
2. "Snippets: Configure Snippets"を入力する
|
|
||||||
3. mermaid.jsonというスニペットファイルを作成する
|
|
||||||
4. 使って確かめてみる
|
|
||||||
1. Mermaidをサポートするファイルを開く(.mdまたは.mmd)
|
|
||||||
2. "mermaid:sequence"と入力する
|
|
||||||
3. Tabキーを押下する
|
|
||||||
|
|
||||||
```json
|
|
||||||
{
|
|
||||||
"Mermaid sequence Diagram": {
|
|
||||||
"prefix": "mermaid:sequence",
|
|
||||||
|
|
||||||
"body": [
|
|
||||||
"sequenceDiagram",
|
|
||||||
" actor User",
|
|
||||||
" participant Front",
|
|
||||||
" participant Server",
|
|
||||||
" User->>Front: Click Button",
|
|
||||||
" Front->>Server: Request Data",
|
|
||||||
" Server-->>Front: Return Data",
|
|
||||||
" Front-->>User: Display Data"
|
|
||||||
],
|
|
||||||
"description": "Create a sequence diagram"
|
|
||||||
}
|
|
||||||
}
|
|
||||||
```
|
|
||||||
|
|
||||||
でない場合はデフォルトでスニペットが無効に
|
|
||||||
なっている場合があります
|
|
||||||
|
|
||||||
markdownでも有効にする場合は`markdown.json`に以下を追記する
|
|
||||||
|
|
||||||
```json
|
|
||||||
"Mermaid sequence Diagram": {
|
|
||||||
"prefix": "mermaid:sequence",
|
|
||||||
"body": [
|
|
||||||
"```mermaid",
|
|
||||||
"sequenceDiagram",
|
|
||||||
" actor User",
|
|
||||||
" participant Front",
|
|
||||||
" participant Server",
|
|
||||||
" User->>Front: Click Button",
|
|
||||||
" Front->>Server: Request Data",
|
|
||||||
" Server-->>Front: Return Data",
|
|
||||||
" Front-->>User: Display Data",
|
|
||||||
"```"
|
|
||||||
],
|
|
||||||
"description": "Create a sequence diagram"
|
|
||||||
}
|
|
||||||
```
|
|
||||||
199
docs/minio.md
199
docs/minio.md
@ -1,199 +0,0 @@
|
|||||||
# MinIO 利用ガイド
|
|
||||||
|
|
||||||
## 概要
|
|
||||||
|
|
||||||
[MinIO](https://min.io/) は Amazon S3 互換のオブジェクトストレージサーバー。軽量かつシンプルな構成で、オンプレミスやクラウド上に S3 互換のストレージ環境を構築できる。
|
|
||||||
|
|
||||||
高可用構成やセキュリティ機能も備えており、小規模から大規模用途まで幅広く利用できる。本記事では MinIO の導入方法、仕様要件、ユースケース、基本的な利用方法についてまとめる。
|
|
||||||
|
|
||||||
---
|
|
||||||
|
|
||||||
## 1. インストール方法
|
|
||||||
|
|
||||||
### 1.1 Docker を使う場合
|
|
||||||
|
|
||||||
```bash
|
|
||||||
docker run -p 9000:9000 -p 9001:9001 \
|
|
||||||
--name minio \
|
|
||||||
-e "MINIO_ROOT_USER=admin" \
|
|
||||||
-e "MINIO_ROOT_PASSWORD=password123" \
|
|
||||||
-v /mnt/data:/data \
|
|
||||||
quay.io/minio/minio server /data --console-address ":9001"
|
|
||||||
```
|
|
||||||
|
|
||||||
- `9000`: S3互換API用ポート
|
|
||||||
- `9001`: Webコンソール用ポート
|
|
||||||
|
|
||||||

|
|
||||||
|
|
||||||
---
|
|
||||||
|
|
||||||
### 1.2 Docker Compose を使う場合
|
|
||||||
|
|
||||||
```yaml
|
|
||||||
version: '3.8'
|
|
||||||
services:
|
|
||||||
minio:
|
|
||||||
image: quay.io/minio/minio
|
|
||||||
ports:
|
|
||||||
- "9000:9000"
|
|
||||||
- "9001:9001"
|
|
||||||
volumes:
|
|
||||||
- ./data:/data
|
|
||||||
environment:
|
|
||||||
MINIO_ROOT_USER: admin
|
|
||||||
MINIO_ROOT_PASSWORD: password123
|
|
||||||
command: server /data --console-address ":9001"
|
|
||||||
restart: unless-stopped
|
|
||||||
```
|
|
||||||
|
|
||||||
起動コマンド:
|
|
||||||
|
|
||||||
```bash
|
|
||||||
docker compose up -d
|
|
||||||
```
|
|
||||||
|
|
||||||
---
|
|
||||||
|
|
||||||
### 1.3 バイナリから直接実行する場合(Linux)
|
|
||||||
|
|
||||||
```bash
|
|
||||||
wget https://dl.min.io/server/minio/release/linux-amd64/minio
|
|
||||||
chmod +x minio
|
|
||||||
sudo mv minio /usr/local/bin/
|
|
||||||
|
|
||||||
export MINIO_ROOT_USER=admin
|
|
||||||
export MINIO_ROOT_PASSWORD=password123
|
|
||||||
minio server /mnt/data --console-address ":9001"
|
|
||||||
```
|
|
||||||
|
|
||||||
---
|
|
||||||
|
|
||||||
## 2. 仕様要件
|
|
||||||
|
|
||||||
| 項目 | 推奨構成例 |
|
|
||||||
|--------------|------------------------------|
|
|
||||||
| OS | Linux(Ubuntu 22.04 など) |
|
|
||||||
| CPU | 1コア以上(最低限) |
|
|
||||||
| メモリ | 1GB 以上(2GB 以上推奨) |
|
|
||||||
| ストレージ | SSD または HDD |
|
|
||||||
| 通信 | ポート 9000 / 9001(開放) |
|
|
||||||
|
|
||||||
- HTTPS を使用する場合は TLS 証明書(Let's Encrypt など)を導入
|
|
||||||
- リバースプロキシ(Nginx/Caddyなど)経由での公開も可能
|
|
||||||
|
|
||||||
---
|
|
||||||
|
|
||||||
## 3. ユースケース・機能
|
|
||||||
|
|
||||||
### 主なユースケース
|
|
||||||
|
|
||||||
- バックアップ保存
|
|
||||||
- Webアプリの画像・動画ストレージ
|
|
||||||
- ログデータ保管
|
|
||||||
- オンプレS3互換ストレージ
|
|
||||||
|
|
||||||
### 主な機能
|
|
||||||
|
|
||||||
- S3 互換API対応
|
|
||||||
- Webベース管理コンソール
|
|
||||||
- IAM風のユーザー・ポリシー制御
|
|
||||||
- TLS対応(HTTPS通信)
|
|
||||||
- サーバーサイド暗号化(AES-256)
|
|
||||||
- マルチテナント対応(認証連携含む)
|
|
||||||
- オブジェクトのバージョン管理(設定時)
|
|
||||||
|
|
||||||
---
|
|
||||||
|
|
||||||
## 4. 実際の使い方
|
|
||||||
|
|
||||||
サンプルコードでは以下を作成しております
|
|
||||||
|
|
||||||
1. バケット作成 : sample-data(readwrite)
|
|
||||||
2. ユーザー設定 : appuser:password123
|
|
||||||
|
|
||||||
|
|
||||||
### Webコンソールを利用する場合
|
|
||||||
|
|
||||||
#### Webコンソールにアクセス
|
|
||||||
|
|
||||||
ブラウザで `http://<ホスト>:9001` にアクセス
|
|
||||||
管理者アカウントでログイン(`MINIO_ROOT_USER` / `MINIO_ROOT_PASSWORD`)
|
|
||||||
|
|
||||||
---
|
|
||||||
|
|
||||||
#### バケット作成・ファイルアップロード
|
|
||||||
|
|
||||||
- Web UI からバケット作成
|
|
||||||
- ローカルからファイルをアップロード可能
|
|
||||||
- バケット単位で「パブリックアクセス許可」も可能
|
|
||||||
|
|
||||||
### `mc` コマンドによる操作
|
|
||||||
|
|
||||||
#### インストール
|
|
||||||
|
|
||||||
```bash
|
|
||||||
wget https://dl.min.io/client/mc/release/linux-amd64/mc
|
|
||||||
chmod +x mc
|
|
||||||
sudo mv mc /usr/local/bin/
|
|
||||||
```
|
|
||||||
|
|
||||||
#### MinIOへの接続
|
|
||||||
|
|
||||||
```bash
|
|
||||||
mc alias set local http://localhost:9000 admin password123
|
|
||||||
```
|
|
||||||
|
|
||||||
#### 操作例
|
|
||||||
|
|
||||||
```bash
|
|
||||||
mc mb local/mybucket
|
|
||||||
mc cp ./example.jpg local/mybucket/
|
|
||||||
mc ls local/mybucket
|
|
||||||
```
|
|
||||||
|
|
||||||
### 各プログラム言語のライブラリから利用する場合
|
|
||||||
|
|
||||||
MinIOはAmazon S3互換のAPIを提供しているためS3対応の
|
|
||||||
クライアントライブラリを使用すればPythonやNode.jsから
|
|
||||||
簡単に接続・操作できます
|
|
||||||
|
|
||||||
* Python: `boto3`
|
|
||||||
* Node.js: `@aws-sdk/client-s3`
|
|
||||||
|
|
||||||
**接続時の注意点**
|
|
||||||
* リージョン
|
|
||||||
* 仮に指定しますが実際は無視される
|
|
||||||
* バージョニング/ライフサイクル/通知
|
|
||||||
* 一部のS3機能はMinIOでサポートされていない、または挙動が違う場合あり
|
|
||||||
* 署名付きURL
|
|
||||||
* boto3などで生成する署名付きURLも動作しますが、MinIOの設定によって挙動が異なることがある
|
|
||||||
|
|
||||||
### minioライブラリ(MinIO公式)
|
|
||||||
|
|
||||||
MinIO専用に最適化されていて、軽量・シンプルで扱いやすいのが特徴です。
|
|
||||||
S3互換APIを使ってはいますがAmazon純正のSDK(@aws-sdk/*)と違いMinIOのユースケースに特化してます
|
|
||||||
|
|
||||||
#### インストール方法
|
|
||||||
|
|
||||||
```sh
|
|
||||||
npm install minio
|
|
||||||
```
|
|
||||||
|
|
||||||
#### インストール方法
|
|
||||||
|
|
||||||
|
|
||||||
|
|
||||||
---
|
|
||||||
|
|
||||||
## 付録:Tips
|
|
||||||
|
|
||||||
- リバースプロキシ(Nginx)を通して HTTPS 公開することで、ブラウザ互換性やセキュリティを向上できる
|
|
||||||
- Cloudflare などのCDNと組み合わせれば、簡易的なグローバル配信も可能
|
|
||||||
- アプリからは AWS SDK を使ってアクセス可能(S3互換)
|
|
||||||
|
|
||||||
---
|
|
||||||
|
|
||||||
## まとめ
|
|
||||||
|
|
||||||
MinIO は S3互換かつ軽量で、開発・検証・軽量サービスにおけるストレージニーズに柔軟に対応できる。Docker環境でも素早く構築可能なため、内部ツールやバックアップ用途として導入検討する価値がある。
|
|
||||||
@ -1,95 +0,0 @@
|
|||||||
|
|
||||||
# [VSCODE]MarkDownを活用する
|
|
||||||
|
|
||||||
- [\[VSCODE\]MarkDownを活用する](#vscodemarkdownを活用する)
|
|
||||||
- [ライブラリ・機能一覧](#ライブラリ機能一覧)
|
|
||||||
- [基本的な操作](#基本的な操作)
|
|
||||||
- [Markdown All in One](#markdown-all-in-one)
|
|
||||||
- [Markdown PDF](#markdown-pdf)
|
|
||||||
- [Markdown Preview Enhanced](#markdown-preview-enhanced)
|
|
||||||
- [Markdown Preview Mermaid Support](#markdown-preview-mermaid-support)
|
|
||||||
- [Markdown Table](#markdown-table)
|
|
||||||
- [Excel to Markdown table](#excel-to-markdown-table)
|
|
||||||
- [Tips](#tips)
|
|
||||||
- [目次作成機能](#目次作成機能)
|
|
||||||
|
|
||||||
**(参考リンク)**
|
|
||||||
* [github markdown-preview-enhanced](https://github.com/shd101wyy/markdown-preview-enhanced/blob/master/docs/ja-jp/file-imports.md)
|
|
||||||
* [qiita 便利な拡張機能5選](https://qiita.com/sola-msr/items/cfe448db958da3d08863#excel-to-markdown-table)
|
|
||||||
|
|
||||||
|
|
||||||
|
|
||||||
## ライブラリ・機能一覧
|
|
||||||
|
|
||||||
* Markdown All in One
|
|
||||||
* Markdown PDF
|
|
||||||
* Markdown Preview Enhanced :PDF出力機能
|
|
||||||
|
|
||||||
### 基本的な操作
|
|
||||||
|
|
||||||
#### Markdown All in One
|
|
||||||
|
|
||||||
1. キーボードショートカット機能
|
|
||||||
1. コード入力候補/補助
|
|
||||||
2. 目次作成機能(ctrl+shift+p -> Markdown All in One: Create Table of Contents)
|
|
||||||
3. 自動補完機能
|
|
||||||
1. 見出しナンバリング
|
|
||||||
2. リスト編集補完
|
|
||||||
3. HTML変換機能
|
|
||||||
4. その他機能
|
|
||||||
1. 数式機能
|
|
||||||
2. テーブル等幅機能
|
|
||||||
5. 画像リンク貼付機能
|
|
||||||
|
|
||||||
コード入力候補/補助
|
|
||||||
|
|
||||||
#### Markdown PDF
|
|
||||||
|
|
||||||
1. PDF出力機能
|
|
||||||
|
|
||||||
#### Markdown Preview Enhanced
|
|
||||||
|
|
||||||
(サイド:Ctrl+K -> V,全面:ctrl+shift+v)
|
|
||||||
|
|
||||||
1. 拡張性の高いマークダウンのプレビュー拡張機能
|
|
||||||
2. ファイル分割機能
|
|
||||||
|
|
||||||
##### Markdown Preview Mermaid Support
|
|
||||||
|
|
||||||
MermaidをViewに表示できるようにする
|
|
||||||
|
|
||||||
[【Mermaid】概要及び基本的な使い方](https://wiki.pglikers.com/en/private/docs/markdown/mermaid)
|
|
||||||
|
|
||||||
#### Markdown Table
|
|
||||||
|
|
||||||
1. 等幅機能、入力補完機能:テーブルを作成中に[`Tab`]キーを使用する
|
|
||||||
|
|
||||||
#### Excel to Markdown table
|
|
||||||
|
|
||||||
エクセル、スプレッドシートからテーブルをコピーする
|
|
||||||
(Shift + Alt + v )
|
|
||||||
|
|
||||||
- Markdown Preview Mermaid Support : MermaidをViewに表示できるようにする
|
|
||||||
|
|
||||||
---
|
|
||||||
|
|
||||||
## Tips
|
|
||||||
|
|
||||||
### キーボードショートカット機能
|
|
||||||
|
|
||||||
| キー | 説明 |
|
|
||||||
| ---------------- | ---------------------------- |
|
|
||||||
| **Ctrl+B** | 選択した文字の太字にする。 |
|
|
||||||
| **Ctrl+I** | 文字を斜体 |
|
|
||||||
| **Ctrl+K -> V** | エディタの横にプレビュー表示 |
|
|
||||||
| **Ctrl+Shift+]** | 見出しレベルを上げる |
|
|
||||||
| **Ctrl+Shift+[** | 見出しレベルを下げる |
|
|
||||||
| Ctrl+M | 数式入力の文字入れる($$) |
|
|
||||||
| Alt+C | チェックリストのオンオフ |
|
|
||||||
| Ctrl+Shift+V | プレビューの表示切替 |
|
|
||||||
|
|
||||||
### 目次作成機能
|
|
||||||
|
|
||||||
1. [`ctrl` +`shift` + `p`]
|
|
||||||
2. "Markdown All in One: Create Table of Contents"を選択する
|
|
||||||
|
|
||||||
@ -1,25 +0,0 @@
|
|||||||
async function main() {
|
|
||||||
const MinioStorage = require('../src/classes/MinioStorage');
|
|
||||||
|
|
||||||
const config = {
|
|
||||||
endPoint: 'localhost',
|
|
||||||
port: 9000,
|
|
||||||
useSSL: false,
|
|
||||||
accessKey: 'appuser',
|
|
||||||
secretKey: 'password123',
|
|
||||||
bucketName: 'sample-data'
|
|
||||||
}
|
|
||||||
|
|
||||||
const storage = new MinioStorage(config);
|
|
||||||
// ファイルを取得する
|
|
||||||
files = await storage.getFileList();
|
|
||||||
console.log(files);
|
|
||||||
|
|
||||||
// ファイルをアップロードする
|
|
||||||
await storage.uploadFile("./src/data/sample2.csv","sample2.csv");
|
|
||||||
files = await storage.getFileList();
|
|
||||||
console.log(files);
|
|
||||||
|
|
||||||
}
|
|
||||||
|
|
||||||
main();
|
|
||||||
2578
package-lock.json
generated
2578
package-lock.json
generated
File diff suppressed because it is too large
Load Diff
15
package.json
15
package.json
@ -2,24 +2,13 @@
|
|||||||
"name": "js-common-code",
|
"name": "js-common-code",
|
||||||
"version": "1.0.0",
|
"version": "1.0.0",
|
||||||
"description": "Javascriptで活用できるコードを開発する。 Node.jsによりサーバーサイドも作成する",
|
"description": "Javascriptで活用できるコードを開発する。 Node.jsによりサーバーサイドも作成する",
|
||||||
"main": "src/server/index.js",
|
"main": "src/server/hellp.js",
|
||||||
"directories": {
|
"directories": {
|
||||||
"doc": "docs"
|
"doc": "docs"
|
||||||
},
|
},
|
||||||
"scripts": {
|
"scripts": {
|
||||||
"dev": "node src/server/index.js",
|
|
||||||
"test": "echo \"Error: no test specified\" && exit 1"
|
"test": "echo \"Error: no test specified\" && exit 1"
|
||||||
},
|
},
|
||||||
"author": "",
|
"author": "",
|
||||||
"license": "ISC",
|
"license": "ISC"
|
||||||
"dependencies": {
|
|
||||||
"@google-cloud/storage": "^7.15.2",
|
|
||||||
"archiver": "^7.0.1",
|
|
||||||
"csv-writer": "^1.6.0",
|
|
||||||
"dotenv": "^16.4.7",
|
|
||||||
"minio": "^8.0.5"
|
|
||||||
},
|
|
||||||
"devDependencies": {
|
|
||||||
"jsdoc": "^4.0.4"
|
|
||||||
}
|
|
||||||
}
|
}
|
||||||
|
|||||||
@ -1,115 +0,0 @@
|
|||||||
// @ts-check を付けると型チェックが有効に!
|
|
||||||
/** @ts-check */
|
|
||||||
|
|
||||||
// 型定義をインポート
|
|
||||||
const Minio = require('minio');
|
|
||||||
// enum を使っている場合
|
|
||||||
const { ProcessType } = require('../types/IStorage');
|
|
||||||
const fs = require('fs');
|
|
||||||
|
|
||||||
|
|
||||||
class MinioStorage {
|
|
||||||
constructor(config) {
|
|
||||||
this.minioClient = new Minio.Client({
|
|
||||||
endPoint: config.endPoint,
|
|
||||||
port: config.port,
|
|
||||||
useSSL: config.useSSL,
|
|
||||||
accessKey: config.accessKey,
|
|
||||||
secretKey: config.secretKey
|
|
||||||
});
|
|
||||||
this.bucketName = config.bucketName;
|
|
||||||
}
|
|
||||||
|
|
||||||
getFileList(prefix = '') {
|
|
||||||
return new Promise((resolve, reject) => {
|
|
||||||
const objectKeys = [];
|
|
||||||
const stream = this.minioClient.listObjects(this.bucketName, prefix, true);
|
|
||||||
stream.on('data', obj => objectKeys.push(obj.name));
|
|
||||||
stream.on('end', () => resolve(objectKeys));
|
|
||||||
stream.on('error', err => reject(err));
|
|
||||||
});
|
|
||||||
}
|
|
||||||
|
|
||||||
async uploadFile(filePath, objectKey) {
|
|
||||||
return this.minioClient.fPutObject(this.bucketName, objectKey, filePath)
|
|
||||||
.then(() => {
|
|
||||||
console.log('File uploaded successfully.');
|
|
||||||
})
|
|
||||||
.catch(err => {
|
|
||||||
console.error('File upload error:', err);
|
|
||||||
throw err;
|
|
||||||
});
|
|
||||||
}
|
|
||||||
|
|
||||||
/**
|
|
||||||
* オブジェクトをファイルとして保存(ローカル)
|
|
||||||
* @param {string} objectKey 取得するオブジェクトキー
|
|
||||||
* @param {string} destinationPath 保存先ファイルパス
|
|
||||||
* @returns {Promise<void>}
|
|
||||||
*/
|
|
||||||
async downloadFile(objectKey, destinationPath) {
|
|
||||||
const dataStream = await this.minioClient.getObject(this.bucketName, objectKey);
|
|
||||||
|
|
||||||
return new Promise((resolve, reject) => {
|
|
||||||
const fileStream = fs.createWriteStream(destinationPath);
|
|
||||||
dataStream.pipe(fileStream);
|
|
||||||
dataStream.on('end', () => {
|
|
||||||
console.log('File Download File end');
|
|
||||||
resolve();
|
|
||||||
});
|
|
||||||
dataStream.on('error', reject);
|
|
||||||
});
|
|
||||||
}
|
|
||||||
|
|
||||||
/**
|
|
||||||
* オブジェクトをメモリ上に読み込む(Buffer)
|
|
||||||
* @param {string} objectKey 取得するオブジェクトキー
|
|
||||||
* @returns {Promise<Buffer>}
|
|
||||||
*/
|
|
||||||
async downloadContents(objectKey) {
|
|
||||||
const dataStream = await this.minioClient.getObject(this.bucketName, objectKey);
|
|
||||||
|
|
||||||
return new Promise((resolve, reject) => {
|
|
||||||
const chunks = [];
|
|
||||||
dataStream.on('data', chunk => chunks.push(chunk));
|
|
||||||
dataStream.on('end', () => resolve(Buffer.concat(chunks)));
|
|
||||||
dataStream.on('error', reject);
|
|
||||||
});
|
|
||||||
}
|
|
||||||
|
|
||||||
/**
|
|
||||||
* 単一オブジェクトを削除する
|
|
||||||
* @param {string} objectKey 削除するオブジェクトキー
|
|
||||||
* @returns {Promise<void>}
|
|
||||||
*/
|
|
||||||
async delete(objectKey) {
|
|
||||||
await this.minioClient.removeObject(this.bucketName, objectKey);
|
|
||||||
console.log('File deleted successfully.');
|
|
||||||
}
|
|
||||||
|
|
||||||
|
|
||||||
/**
|
|
||||||
* 署名付きURLを生成する(GET or PUT)
|
|
||||||
* @param {string} objectKey 対象のオブジェクトキー
|
|
||||||
* @param {number} processType 処理タイプ(0=GET, 1=PUT)
|
|
||||||
* @param {{ expiresIn: number }} options 有効期限(秒)
|
|
||||||
* @returns {Promise<string>} 発行された署名付きURL
|
|
||||||
*/
|
|
||||||
async getSignedUrl(objectKey, processType, options) {
|
|
||||||
if (!options.expiresIn) {
|
|
||||||
options.expiresIn = 60 * 60; // 1 hours
|
|
||||||
}
|
|
||||||
switch (processType) {
|
|
||||||
case ProcessType.GET:
|
|
||||||
return this.minioClient.presignedGetObject(this.bucketName, objectKey, options.expiresIn);
|
|
||||||
case ProcessType.PUT:
|
|
||||||
return this.minioClient.presignedPutObject(this.bucketName, objectKey, options.expiresIn);
|
|
||||||
default:
|
|
||||||
throw new Error('Invalid process type.');
|
|
||||||
}
|
|
||||||
}
|
|
||||||
}
|
|
||||||
|
|
||||||
|
|
||||||
|
|
||||||
module.exports = MinioStorage;
|
|
||||||
@ -1,70 +0,0 @@
|
|||||||
/**
|
|
||||||
* TimeWatch class
|
|
||||||
* @class
|
|
||||||
* @classdesc TimeWatch class to measure elapsed time
|
|
||||||
*/
|
|
||||||
class TimeWatch{
|
|
||||||
/**
|
|
||||||
* TimeWatch constructor
|
|
||||||
* @constructor
|
|
||||||
* @description TimeWatch constructor
|
|
||||||
* @param {number} startTime - start time
|
|
||||||
* @param {number} endTime - end time
|
|
||||||
*/
|
|
||||||
constructor(){
|
|
||||||
this.startTime = 0;
|
|
||||||
this.endTime = 0;
|
|
||||||
}
|
|
||||||
|
|
||||||
/**
|
|
||||||
* Start the timer
|
|
||||||
* @function
|
|
||||||
* @description Start the timer
|
|
||||||
*/
|
|
||||||
start(){
|
|
||||||
this.startTime = new Date().getTime();
|
|
||||||
}
|
|
||||||
/**
|
|
||||||
* Stop the timer
|
|
||||||
* @function
|
|
||||||
* @description Stop the timer
|
|
||||||
*/
|
|
||||||
stop(){
|
|
||||||
this.endTime = new Date().getTime();
|
|
||||||
}
|
|
||||||
|
|
||||||
/**
|
|
||||||
* Get the elapsed time
|
|
||||||
* @function
|
|
||||||
* @description Get the elapsed time
|
|
||||||
* @param {string} unit - unit of time (ms, s, min, h)
|
|
||||||
* @returns {number} - elapsed time
|
|
||||||
*/
|
|
||||||
getElapsedTime(unit = "ms") {
|
|
||||||
const elapsedTime = this.endTime - this.startTime;
|
|
||||||
|
|
||||||
switch (unit) {
|
|
||||||
case "s":
|
|
||||||
return elapsedTime / 1000;
|
|
||||||
case "min":
|
|
||||||
return elapsedTime / (1000 * 60);
|
|
||||||
case "h":
|
|
||||||
return elapsedTime / (1000 * 60 * 60);
|
|
||||||
case "ms":
|
|
||||||
default:
|
|
||||||
return elapsedTime;
|
|
||||||
}
|
|
||||||
}
|
|
||||||
/**
|
|
||||||
* Print the elapsed time
|
|
||||||
* @function
|
|
||||||
* @description Print the elapsed time
|
|
||||||
* @param {string} unit - unit of time (ms, s, min, h)
|
|
||||||
*/
|
|
||||||
printElapsedTime(unit = "ms") {
|
|
||||||
console.log(`Elapsed Time: ${this.getElapsedTime(unit)} ${unit}`);
|
|
||||||
}
|
|
||||||
}
|
|
||||||
|
|
||||||
// commonJS module
|
|
||||||
module.exports = TimeWatch;
|
|
||||||
@ -1,11 +0,0 @@
|
|||||||
ID,Name,Age,Email
|
|
||||||
1,User_1,26,user1@example.com
|
|
||||||
2,User_2,65,user2@example.com
|
|
||||||
3,User_3,39,user3@example.com
|
|
||||||
4,User_4,51,user4@example.com
|
|
||||||
5,User_5,25,user5@example.com
|
|
||||||
6,User_6,26,user6@example.com
|
|
||||||
7,User_7,69,user7@example.com
|
|
||||||
8,User_8,47,user8@example.com
|
|
||||||
9,User_9,40,user9@example.com
|
|
||||||
10,User_10,28,user10@example.com
|
|
||||||
|
@ -1,11 +0,0 @@
|
|||||||
ID,Name,Age,Email
|
|
||||||
1,User_1,63,user1@example.com
|
|
||||||
2,User_2,46,user2@example.com
|
|
||||||
3,User_3,69,user3@example.com
|
|
||||||
4,User_4,62,user4@example.com
|
|
||||||
5,User_5,64,user5@example.com
|
|
||||||
6,User_6,52,user6@example.com
|
|
||||||
7,User_7,41,user7@example.com
|
|
||||||
8,User_8,64,user8@example.com
|
|
||||||
9,User_9,22,user9@example.com
|
|
||||||
10,User_10,62,user10@example.com
|
|
||||||
|
Binary file not shown.
@ -1,11 +0,0 @@
|
|||||||
ID,Name,Age,Email
|
|
||||||
1,User_1,44,user1@example.com
|
|
||||||
2,User_2,20,user2@example.com
|
|
||||||
3,User_3,67,user3@example.com
|
|
||||||
4,User_4,49,user4@example.com
|
|
||||||
5,User_5,56,user5@example.com
|
|
||||||
6,User_6,63,user6@example.com
|
|
||||||
7,User_7,31,user7@example.com
|
|
||||||
8,User_8,67,user8@example.com
|
|
||||||
9,User_9,41,user9@example.com
|
|
||||||
10,User_10,30,user10@example.com
|
|
||||||
|
@ -1,11 +0,0 @@
|
|||||||
ID,Name,Age,Email
|
|
||||||
1,User_1,37,user1@example.com
|
|
||||||
2,User_2,30,user2@example.com
|
|
||||||
3,User_3,63,user3@example.com
|
|
||||||
4,User_4,42,user4@example.com
|
|
||||||
5,User_5,31,user5@example.com
|
|
||||||
6,User_6,63,user6@example.com
|
|
||||||
7,User_7,28,user7@example.com
|
|
||||||
8,User_8,20,user8@example.com
|
|
||||||
9,User_9,42,user9@example.com
|
|
||||||
10,User_10,69,user10@example.com
|
|
||||||
|
@ -1,79 +0,0 @@
|
|||||||
/**
|
|
||||||
* @description downloadボタンを押下したらCSVファイルをzip圧縮してダウンロードする
|
|
||||||
*/
|
|
||||||
|
|
||||||
|
|
||||||
// ダウンロードボタン
|
|
||||||
const downloadButton = document.getElementById('download-button');
|
|
||||||
const downloadButtonFile = document.getElementById('download-button-file');
|
|
||||||
|
|
||||||
// ダウンロードボタンを押下した時の処理を記載する
|
|
||||||
downloadButton.addEventListener('click', async () => {
|
|
||||||
// ダウンロードボタンを無効化する
|
|
||||||
downloadButton.disabled = true;
|
|
||||||
// ダウンロード処理を実行する
|
|
||||||
try {
|
|
||||||
const zip = new JSZip();
|
|
||||||
// ZIPにファイルを追加
|
|
||||||
zip.file("hello.txt", "Hello, this is a ZIP file!");
|
|
||||||
zip.file("world.txt", "Hello, this is a ZIP file!");
|
|
||||||
|
|
||||||
// ZIPを生成してダウンロード
|
|
||||||
const zipBlob = await zip.generateAsync({ type: "blob" });
|
|
||||||
const a = document.createElement("a");
|
|
||||||
a.href = URL.createObjectURL(zipBlob);
|
|
||||||
a.download = "example.zip";
|
|
||||||
document.body.appendChild(a);
|
|
||||||
a.click();
|
|
||||||
document.body.removeChild(a);
|
|
||||||
} catch (e) {
|
|
||||||
// エラーが発生した場合
|
|
||||||
console.error(e);
|
|
||||||
alert('ダウンロードに失敗しました');
|
|
||||||
} finally {
|
|
||||||
// ダウンロードボタンを有効化する
|
|
||||||
downloadButton.disabled = false;
|
|
||||||
}
|
|
||||||
});
|
|
||||||
|
|
||||||
|
|
||||||
downloadButtonFile.addEventListener('click', async () => {
|
|
||||||
// ダウンロードボタンを無効化する
|
|
||||||
downloadButtonFile.disabled = true;
|
|
||||||
try {
|
|
||||||
const files = [
|
|
||||||
{ name: "text1.csv", url: "assets/data/test_data_1.csv" },
|
|
||||||
{ name: "text2.csv", url: "assets/data/test_data_2.csv" }
|
|
||||||
];
|
|
||||||
|
|
||||||
const zip = new JSZip();
|
|
||||||
|
|
||||||
// CSV ファイルを取得して ZIP に追加
|
|
||||||
await Promise.all(
|
|
||||||
files.map(async (file) => {
|
|
||||||
const response = await fetch(file.url);
|
|
||||||
if (!response.ok) throw new Error(`Failed to fetch ${file.name}`);
|
|
||||||
const text = await response.text();
|
|
||||||
zip.file(file.name, text);
|
|
||||||
})
|
|
||||||
);
|
|
||||||
|
|
||||||
// ZIP を生成してダウンロード
|
|
||||||
zip.generateAsync({ type: "blob" }).then((blob) => {
|
|
||||||
const link = document.createElement("a");
|
|
||||||
link.href = URL.createObjectURL(blob);
|
|
||||||
link.download = "files.zip";
|
|
||||||
document.body.appendChild(link);
|
|
||||||
link.click();
|
|
||||||
document.body.removeChild(link);
|
|
||||||
}).catch(console.error)
|
|
||||||
} catch (e) {
|
|
||||||
// エラーが発生した場合
|
|
||||||
console.error(e);
|
|
||||||
alert('ダウンロードに失敗しました');
|
|
||||||
}
|
|
||||||
finally {
|
|
||||||
// ダウンロードボタンを有効化する
|
|
||||||
downloadButtonFile.disabled = false;
|
|
||||||
}
|
|
||||||
});
|
|
||||||
@ -1,72 +0,0 @@
|
|||||||
/**
|
|
||||||
* @description downloadボタンを押下したらCSVファイルをzip圧縮してダウンロードする
|
|
||||||
*/
|
|
||||||
|
|
||||||
|
|
||||||
// ダウンロードボタン
|
|
||||||
const downloadButtonServer = document.getElementById('download-button-server');
|
|
||||||
|
|
||||||
// ダウンロードボタンを押下した時の処理を記載する
|
|
||||||
downloadButtonServer.addEventListener('click', async () => {
|
|
||||||
// Blobで取得する方法
|
|
||||||
console.log('downloadButtonServer');
|
|
||||||
// ダウンロードボタンを無効化する
|
|
||||||
downloadButtonServer.disabled = true;
|
|
||||||
// ダウンロード処理を実行する
|
|
||||||
try {
|
|
||||||
// localhost:3000/downdload にリクエストを送る
|
|
||||||
const response = await fetch('http://localhost:3000/downdload');
|
|
||||||
if (!response.ok) throw new Error('Failed to fetch');
|
|
||||||
|
|
||||||
// ZIPファイルを取得
|
|
||||||
const zipBlob = await response.blob();
|
|
||||||
const a = document.createElement("a");
|
|
||||||
a.href = URL.createObjectURL(zipBlob);
|
|
||||||
a.download = "serverFile.zip";
|
|
||||||
document.body.appendChild(a);
|
|
||||||
a.click();
|
|
||||||
document.body.removeChild(a);
|
|
||||||
} catch (e) {
|
|
||||||
// エラーが発生した場合
|
|
||||||
console.error(e);
|
|
||||||
alert('ダウンロードに失敗しました');
|
|
||||||
} finally {
|
|
||||||
// ダウンロードボタンを有効化する
|
|
||||||
downloadButtonServer.disabled = false;
|
|
||||||
}
|
|
||||||
});
|
|
||||||
|
|
||||||
// ダウンロードボタン(アップロード)
|
|
||||||
const downloadButtonUpload = document.getElementById('download-button-upload');
|
|
||||||
|
|
||||||
// ダウンロードボタンを押下した時の処理を記載する
|
|
||||||
downloadButtonUpload.addEventListener('click', async () => {
|
|
||||||
console.log('downloadButtonUpload');
|
|
||||||
// ダウンロードボタンを無効化する
|
|
||||||
downloadButtonUpload.disabled = true;
|
|
||||||
// サーバーにアップロード処理APIを送信する
|
|
||||||
try {
|
|
||||||
// localhost:3000/generate-zip にリクエストを送る
|
|
||||||
const response = await fetch('http://localhost:3000/generate-zip');
|
|
||||||
if (!response.ok) throw new Error('Failed to fetch');
|
|
||||||
|
|
||||||
// レスポンスからURLを取得
|
|
||||||
const { url } = await response.json();
|
|
||||||
// 取得したURLを開く
|
|
||||||
window.open(url);
|
|
||||||
|
|
||||||
} catch (e) {
|
|
||||||
// エラーが発生した場合
|
|
||||||
console.error(e);
|
|
||||||
alert('ダウンロードに失敗しました');
|
|
||||||
} finally {
|
|
||||||
// ダウンロードボタンを有効化する
|
|
||||||
downloadButtonUpload.disabled = false;
|
|
||||||
}
|
|
||||||
|
|
||||||
});
|
|
||||||
|
|
||||||
|
|
||||||
|
|
||||||
|
|
||||||
|
|
||||||
13
src/front/assets/lib/jszip.min.js
vendored
13
src/front/assets/lib/jszip.min.js
vendored
File diff suppressed because one or more lines are too long
@ -1,21 +0,0 @@
|
|||||||
<!DOCTYPE html>
|
|
||||||
<html lang="en">
|
|
||||||
<head>
|
|
||||||
<meta charset="UTF-8">
|
|
||||||
<meta name="viewport" content="width=device-width, initial-scale=1.0">
|
|
||||||
<script src="https://cdnjs.cloudflare.com/ajax/libs/jszip/3.10.1/jszip.min.js"></script>
|
|
||||||
<title>Download</title>
|
|
||||||
</head>
|
|
||||||
<body>
|
|
||||||
<h1>JavaScript Develop Download To Front Side</h1>
|
|
||||||
<p >Zip File Download</p>
|
|
||||||
<button id="download-button">Zip Download(From Content)</button>
|
|
||||||
<button id="download-button-file">Zip Download(From File)</button>
|
|
||||||
<p >Server </p>
|
|
||||||
<button id="download-button-server">Zip Download(From Server)</button>
|
|
||||||
<button id="download-button-upload">Zip Download(upload)</button>
|
|
||||||
<p >Google Storage Link</p>
|
|
||||||
<script src="assets/download.js"></script>
|
|
||||||
<script src="assets/downloadFromServer.js"></script>
|
|
||||||
</body>
|
|
||||||
</html>
|
|
||||||
@ -1,15 +0,0 @@
|
|||||||
<!DOCTYPE html>
|
|
||||||
<html lang="en">
|
|
||||||
<head>
|
|
||||||
<meta charset="UTF-8">
|
|
||||||
<meta name="viewport" content="width=device-width, initial-scale=1.0">
|
|
||||||
<script src="https://cdnjs.cloudflare.com/ajax/libs/jszip/3.10.1/jszip.min.js"></script>
|
|
||||||
<title>Google Cloud Storage</title>
|
|
||||||
</head>
|
|
||||||
<body>
|
|
||||||
<h1>JavaScript Develop Download To Google Cloud Storage</h1>
|
|
||||||
<p >Zip File Download</p>
|
|
||||||
<button id="download-button">Zip Download(GCS)</button>
|
|
||||||
<script src="assets/cloud-storage.js"></script>
|
|
||||||
</body>
|
|
||||||
</html>
|
|
||||||
@ -8,6 +8,6 @@
|
|||||||
<body>
|
<body>
|
||||||
<h1>JavaScript Develop Debug</h1>
|
<h1>JavaScript Develop Debug</h1>
|
||||||
<p id="message">Open the console to see the output</p>
|
<p id="message">Open the console to see the output</p>
|
||||||
<script src="assets/index.js"></script>
|
<script src="index.js"></script>
|
||||||
</body>
|
</body>
|
||||||
</html>
|
</html>
|
||||||
@ -1,129 +0,0 @@
|
|||||||
|
|
||||||
/**
|
|
||||||
* @requires archiver
|
|
||||||
* - npm install archiver
|
|
||||||
* @example
|
|
||||||
* node src/script/archiveFiles.js data output.zip
|
|
||||||
*/
|
|
||||||
const archiver = require('archiver');
|
|
||||||
const fs = require('fs');
|
|
||||||
const path = require('path');
|
|
||||||
|
|
||||||
const TimeWatch = require('../classes/TimeWatch');
|
|
||||||
|
|
||||||
|
|
||||||
/**
|
|
||||||
* 特定のディレクトリからzipファイルを作成する
|
|
||||||
*
|
|
||||||
* @param {*} sourceDir
|
|
||||||
* @param {*} outputFilePath
|
|
||||||
* @returns
|
|
||||||
*/
|
|
||||||
const createZipFile = (sourceDir, outputFilePath) => {
|
|
||||||
return new Promise((resolve, reject) => {
|
|
||||||
const output = fs.createWriteStream(outputFilePath);
|
|
||||||
const archive = archiver('zip', {
|
|
||||||
zlib: { level: 9 } // 圧縮レベル
|
|
||||||
});
|
|
||||||
output.on('close', () => {
|
|
||||||
console.log(`ZIPファイル作成完了: ${outputFilePath}`);
|
|
||||||
resolve();
|
|
||||||
});
|
|
||||||
archive.on('error', (err) => {
|
|
||||||
reject(err);
|
|
||||||
});
|
|
||||||
archive.pipe(output);
|
|
||||||
archive.directory(sourceDir, false);
|
|
||||||
archive.finalize();
|
|
||||||
});
|
|
||||||
};
|
|
||||||
|
|
||||||
/**
|
|
||||||
* ディレクトリのサイズを測定する
|
|
||||||
* @description デバッグ用途で本番ではコメントアウトする
|
|
||||||
* @param {*} dir
|
|
||||||
* @returns
|
|
||||||
*/
|
|
||||||
const _debugDirectorySize = (dir) => {
|
|
||||||
let size = 0;
|
|
||||||
const files = fs.readdirSync(dir);
|
|
||||||
for (let file of files) {
|
|
||||||
const filePath = path.join(dir, file);
|
|
||||||
const stat = fs.statSync(filePath);
|
|
||||||
if (stat.isFile()) {
|
|
||||||
size += stat.size;
|
|
||||||
} else if (stat.isDirectory()) {
|
|
||||||
size += _getDirectorySize(filePath);
|
|
||||||
}
|
|
||||||
}
|
|
||||||
|
|
||||||
// デバッグ用にサイズを表示する
|
|
||||||
if (size < 1000) {
|
|
||||||
// 1000バイトまでの場合はbytesで表示する
|
|
||||||
console.log(`Directory: ${dir}, Size: ${size} Biytes`);
|
|
||||||
} else if(size < 1000000) {
|
|
||||||
// 1000バイト以上、1000000バイト未満の場合はKBで表示する 小数点は第2位まで表示する
|
|
||||||
console.log(`Directory: ${dir}, Size: ${Math.round(size / 1000 * 100) / 100} KB`);
|
|
||||||
} else if(size < 1000000000) {
|
|
||||||
// 1000000バイト以上、1000000000バイト未満の場合はMBで表示する 小数点は第2位まで表示する
|
|
||||||
console.log(`Directory: ${dir}, Size: ${Math.round(size / 1000000 * 100) / 100} MB`);
|
|
||||||
} else {
|
|
||||||
// 1000000000バイト以上の場合はGBで表示する 小数点は第2位まで表示する
|
|
||||||
console.log(`Directory: ${dir}, Size: ${Math.round(size / 1000000000 * 100) / 100} GB`);
|
|
||||||
}
|
|
||||||
return size;
|
|
||||||
};
|
|
||||||
|
|
||||||
/**
|
|
||||||
* エントリーポイント
|
|
||||||
*
|
|
||||||
* @function main
|
|
||||||
* @param {string[]} args - コマンドライン引数 (process.argv を除いたもの)
|
|
||||||
* @returns {void}
|
|
||||||
*
|
|
||||||
* @example
|
|
||||||
* // フォルダ data を output.zip に圧縮する
|
|
||||||
* node src/script/archiveFiles.js csv_output output.zip
|
|
||||||
*
|
|
||||||
*/
|
|
||||||
const main = (args) => {
|
|
||||||
if (args.includes('--help')) {
|
|
||||||
console.log(`
|
|
||||||
Usage: node archiveFiles.js [sourceDir] [outputFile]
|
|
||||||
|
|
||||||
args:
|
|
||||||
sourceDir : 圧縮するディレクトリ
|
|
||||||
outputFile : 出力ファイル名
|
|
||||||
|
|
||||||
Options:
|
|
||||||
--help ヘルプを表示
|
|
||||||
`);
|
|
||||||
return
|
|
||||||
}
|
|
||||||
|
|
||||||
// 引数が2つ以外の場合はエラー
|
|
||||||
if (args.length !== 2) {
|
|
||||||
console.error('エラー: 引数が正しくありません。');
|
|
||||||
console.error('Usage: node script.js [sourceDir] [outputFile]');
|
|
||||||
return;
|
|
||||||
}
|
|
||||||
const sourceDir = args[0];
|
|
||||||
// ファイルの存在チェック
|
|
||||||
if (!fs.existsSync(sourceDir)) {
|
|
||||||
console.error(`エラー: ディレクトリが存在しません: ${sourceDir}`);
|
|
||||||
return;
|
|
||||||
}
|
|
||||||
const outputFilePath = args[1];
|
|
||||||
// prodモード以外の場合は表示する
|
|
||||||
if(process.env.NODE_ENV !== 'production') _debugDirectorySize(sourceDir);
|
|
||||||
|
|
||||||
const timeWatch = new TimeWatch();
|
|
||||||
timeWatch.start();
|
|
||||||
createZipFile(sourceDir, outputFilePath);
|
|
||||||
timeWatch.stop();
|
|
||||||
timeWatch.printElapsedTime();
|
|
||||||
}
|
|
||||||
|
|
||||||
|
|
||||||
console.log(`start ${process.argv[1]}`);
|
|
||||||
main(process.argv.slice(2));
|
|
||||||
@ -1,26 +0,0 @@
|
|||||||
/**
|
|
||||||
* @fileoverview Google Cloud Storage (GCS) download module.
|
|
||||||
*/
|
|
||||||
const path = require('path');
|
|
||||||
const { Storage } = require('@google-cloud/storage');
|
|
||||||
|
|
||||||
const KEY_FILE_PATH = './keys/service-account.json'
|
|
||||||
// バケット名、ファイル名を.envから取得する
|
|
||||||
const BUCKET_NAME = process.env.BUCKET_NAME;
|
|
||||||
const FILE_NAME = process.env.FILE_NAME;
|
|
||||||
|
|
||||||
|
|
||||||
const storage = new Storage({
|
|
||||||
keyFilename: KEY_FILE_PATH});
|
|
||||||
|
|
||||||
// ファイルのコンテンツをダウンロードする
|
|
||||||
const downloadFile = async () => {
|
|
||||||
const options = {
|
|
||||||
destination: path.join(__dirname, FILE_NAME)
|
|
||||||
};
|
|
||||||
await storage.bucket(BUCKET_NAME).file(FILE_NAME).download(options);
|
|
||||||
// 取得したファイルのコンテンツからファイルを生成する
|
|
||||||
console.log(`Downloaded ${FILE_NAME}`);
|
|
||||||
};
|
|
||||||
downloadFile();
|
|
||||||
|
|
||||||
@ -1,73 +0,0 @@
|
|||||||
#!/usr/bin/env node
|
|
||||||
|
|
||||||
/**
|
|
||||||
* CSVファイルを生成するスクリプト
|
|
||||||
*
|
|
||||||
* @requires csv-writer
|
|
||||||
* - npm install csv-writer
|
|
||||||
* @example
|
|
||||||
* // コマンドラインから実行する場合:
|
|
||||||
* node src/script/generateCSV.js
|
|
||||||
*/
|
|
||||||
|
|
||||||
const fs = require('fs');
|
|
||||||
const path = require('path');
|
|
||||||
const createCsvWriter = require('csv-writer').createObjectCsvWriter;
|
|
||||||
|
|
||||||
|
|
||||||
/**
|
|
||||||
* 乱数を使ってダミーデータを生成する
|
|
||||||
* @param {*} numRecords
|
|
||||||
* @returns
|
|
||||||
*/
|
|
||||||
const generateData = (numRecords) => {
|
|
||||||
const data = [];
|
|
||||||
for (let i = 1; i <= numRecords; i++) {
|
|
||||||
data.push({
|
|
||||||
id: i,
|
|
||||||
name: `User_${i}`,
|
|
||||||
age: Math.floor(Math.random() * 50) + 20, // 20~69歳
|
|
||||||
email: `user${i}@example.com`,
|
|
||||||
});
|
|
||||||
}
|
|
||||||
return data;
|
|
||||||
};
|
|
||||||
|
|
||||||
/**
|
|
||||||
* 指定した数のCSVファイルを作成
|
|
||||||
* @param {*} numFiles
|
|
||||||
* @param {*} numRecordsPerFile
|
|
||||||
* @param {*} outputDir
|
|
||||||
*/
|
|
||||||
const createCsvFiles = async (numFiles, numRecordsPerFile, outputDir) => {
|
|
||||||
if (!fs.existsSync(outputDir)) {
|
|
||||||
fs.mkdirSync(outputDir, { recursive: true });
|
|
||||||
}
|
|
||||||
|
|
||||||
for (let i = 1; i <= numFiles; i++) {
|
|
||||||
const filePath = path.join(outputDir, `test_data_${i}.csv`);
|
|
||||||
|
|
||||||
const csvWriter = createCsvWriter({
|
|
||||||
path: filePath,
|
|
||||||
header: [
|
|
||||||
{ id: 'id', title: 'ID' },
|
|
||||||
{ id: 'name', title: 'Name' },
|
|
||||||
{ id: 'age', title: 'Age' },
|
|
||||||
{ id: 'email', title: 'Email' },
|
|
||||||
],
|
|
||||||
});
|
|
||||||
const data = generateData(numRecordsPerFile);
|
|
||||||
await csvWriter.writeRecords(data);
|
|
||||||
console.log(`CSVファイル作成完了: ${filePath}`);
|
|
||||||
}
|
|
||||||
};
|
|
||||||
|
|
||||||
|
|
||||||
// **設定**
|
|
||||||
const numFiles = 3; // 作成するファイル数
|
|
||||||
const numRecordsPerFile = 10; // 各ファイルのレコード数
|
|
||||||
const outputDir = './csv_output'; // 保存ディレクトリ
|
|
||||||
|
|
||||||
createCsvFiles(numFiles, numRecordsPerFile, outputDir)
|
|
||||||
.then(() => console.log('全てのCSVファイルの作成が完了しました!'))
|
|
||||||
.catch(err => console.error('エラー:', err));
|
|
||||||
@ -1,199 +0,0 @@
|
|||||||
# MinIO 利用ガイド
|
|
||||||
|
|
||||||
## 概要
|
|
||||||
|
|
||||||
[MinIO](https://min.io/) は Amazon S3 互換のオブジェクトストレージサーバー。軽量かつシンプルな構成で、オンプレミスやクラウド上に S3 互換のストレージ環境を構築できる。
|
|
||||||
|
|
||||||
高可用構成やセキュリティ機能も備えており、小規模から大規模用途まで幅広く利用できる。本記事では MinIO の導入方法、仕様要件、ユースケース、基本的な利用方法についてまとめる。
|
|
||||||
|
|
||||||
---
|
|
||||||
|
|
||||||
## 1. インストール方法
|
|
||||||
|
|
||||||
### 1.1 Docker を使う場合
|
|
||||||
|
|
||||||
```bash
|
|
||||||
docker run -p 9000:9000 -p 9001:9001 \
|
|
||||||
--name minio \
|
|
||||||
-e "MINIO_ROOT_USER=admin" \
|
|
||||||
-e "MINIO_ROOT_PASSWORD=password123" \
|
|
||||||
-v /mnt/data:/data \
|
|
||||||
quay.io/minio/minio server /data --console-address ":9001"
|
|
||||||
```
|
|
||||||
|
|
||||||
- `9000`: S3互換API用ポート
|
|
||||||
- `9001`: Webコンソール用ポート
|
|
||||||
|
|
||||||

|
|
||||||
|
|
||||||
---
|
|
||||||
|
|
||||||
### 1.2 Docker Compose を使う場合
|
|
||||||
|
|
||||||
```yaml
|
|
||||||
version: '3.8'
|
|
||||||
services:
|
|
||||||
minio:
|
|
||||||
image: quay.io/minio/minio
|
|
||||||
ports:
|
|
||||||
- "9000:9000"
|
|
||||||
- "9001:9001"
|
|
||||||
volumes:
|
|
||||||
- ./data:/data
|
|
||||||
environment:
|
|
||||||
MINIO_ROOT_USER: admin
|
|
||||||
MINIO_ROOT_PASSWORD: password123
|
|
||||||
command: server /data --console-address ":9001"
|
|
||||||
restart: unless-stopped
|
|
||||||
```
|
|
||||||
|
|
||||||
起動コマンド:
|
|
||||||
|
|
||||||
```bash
|
|
||||||
docker compose up -d
|
|
||||||
```
|
|
||||||
|
|
||||||
---
|
|
||||||
|
|
||||||
### 1.3 バイナリから直接実行する場合(Linux)
|
|
||||||
|
|
||||||
```bash
|
|
||||||
wget https://dl.min.io/server/minio/release/linux-amd64/minio
|
|
||||||
chmod +x minio
|
|
||||||
sudo mv minio /usr/local/bin/
|
|
||||||
|
|
||||||
export MINIO_ROOT_USER=admin
|
|
||||||
export MINIO_ROOT_PASSWORD=password123
|
|
||||||
minio server /mnt/data --console-address ":9001"
|
|
||||||
```
|
|
||||||
|
|
||||||
---
|
|
||||||
|
|
||||||
## 2. 仕様要件
|
|
||||||
|
|
||||||
| 項目 | 推奨構成例 |
|
|
||||||
|--------------|------------------------------|
|
|
||||||
| OS | Linux(Ubuntu 22.04 など) |
|
|
||||||
| CPU | 1コア以上(最低限) |
|
|
||||||
| メモリ | 1GB 以上(2GB 以上推奨) |
|
|
||||||
| ストレージ | SSD または HDD |
|
|
||||||
| 通信 | ポート 9000 / 9001(開放) |
|
|
||||||
|
|
||||||
- HTTPS を使用する場合は TLS 証明書(Let's Encrypt など)を導入
|
|
||||||
- リバースプロキシ(Nginx/Caddyなど)経由での公開も可能
|
|
||||||
|
|
||||||
---
|
|
||||||
|
|
||||||
## 3. ユースケース・機能
|
|
||||||
|
|
||||||
### 主なユースケース
|
|
||||||
|
|
||||||
- バックアップ保存
|
|
||||||
- Webアプリの画像・動画ストレージ
|
|
||||||
- ログデータ保管
|
|
||||||
- オンプレS3互換ストレージ
|
|
||||||
|
|
||||||
### 主な機能
|
|
||||||
|
|
||||||
- S3 互換API対応
|
|
||||||
- Webベース管理コンソール
|
|
||||||
- IAM風のユーザー・ポリシー制御
|
|
||||||
- TLS対応(HTTPS通信)
|
|
||||||
- サーバーサイド暗号化(AES-256)
|
|
||||||
- マルチテナント対応(認証連携含む)
|
|
||||||
- オブジェクトのバージョン管理(設定時)
|
|
||||||
|
|
||||||
---
|
|
||||||
|
|
||||||
## 4. 実際の使い方
|
|
||||||
|
|
||||||
サンプルコードでは以下を作成しております
|
|
||||||
|
|
||||||
1. バケット作成 : sample-data(readwrite)
|
|
||||||
2. ユーザー設定 : appuser:password123
|
|
||||||
|
|
||||||
|
|
||||||
### Webコンソールを利用する場合
|
|
||||||
|
|
||||||
#### Webコンソールにアクセス
|
|
||||||
|
|
||||||
ブラウザで `http://<ホスト>:9001` にアクセス
|
|
||||||
管理者アカウントでログイン(`MINIO_ROOT_USER` / `MINIO_ROOT_PASSWORD`)
|
|
||||||
|
|
||||||
---
|
|
||||||
|
|
||||||
#### バケット作成・ファイルアップロード
|
|
||||||
|
|
||||||
- Web UI からバケット作成
|
|
||||||
- ローカルからファイルをアップロード可能
|
|
||||||
- バケット単位で「パブリックアクセス許可」も可能
|
|
||||||
|
|
||||||
### `mc` コマンドによる操作
|
|
||||||
|
|
||||||
#### インストール
|
|
||||||
|
|
||||||
```bash
|
|
||||||
wget https://dl.min.io/client/mc/release/linux-amd64/mc
|
|
||||||
chmod +x mc
|
|
||||||
sudo mv mc /usr/local/bin/
|
|
||||||
```
|
|
||||||
|
|
||||||
#### MinIOへの接続
|
|
||||||
|
|
||||||
```bash
|
|
||||||
mc alias set local http://localhost:9000 admin password123
|
|
||||||
```
|
|
||||||
|
|
||||||
#### 操作例
|
|
||||||
|
|
||||||
```bash
|
|
||||||
mc mb local/mybucket
|
|
||||||
mc cp ./example.jpg local/mybucket/
|
|
||||||
mc ls local/mybucket
|
|
||||||
```
|
|
||||||
|
|
||||||
### 各プログラム言語のライブラリから利用する場合
|
|
||||||
|
|
||||||
MinIOはAmazon S3互換のAPIを提供しているためS3対応の
|
|
||||||
クライアントライブラリを使用すればPythonやNode.jsから
|
|
||||||
簡単に接続・操作できます
|
|
||||||
|
|
||||||
* Python: `boto3`
|
|
||||||
* Node.js: `@aws-sdk/client-s3`
|
|
||||||
|
|
||||||
**接続時の注意点**
|
|
||||||
* リージョン
|
|
||||||
* 仮に指定しますが実際は無視される
|
|
||||||
* バージョニング/ライフサイクル/通知
|
|
||||||
* 一部のS3機能はMinIOでサポートされていない、または挙動が違う場合あり
|
|
||||||
* 署名付きURL
|
|
||||||
* boto3などで生成する署名付きURLも動作しますが、MinIOの設定によって挙動が異なることがある
|
|
||||||
|
|
||||||
### minioライブラリ(MinIO公式)
|
|
||||||
|
|
||||||
MinIO専用に最適化されていて、軽量・シンプルで扱いやすいのが特徴です。
|
|
||||||
S3互換APIを使ってはいますがAmazon純正のSDK(@aws-sdk/*)と違いMinIOのユースケースに特化してます
|
|
||||||
|
|
||||||
#### インストール方法
|
|
||||||
|
|
||||||
```sh
|
|
||||||
npm install minio
|
|
||||||
```
|
|
||||||
|
|
||||||
#### インストール方法
|
|
||||||
|
|
||||||
|
|
||||||
|
|
||||||
---
|
|
||||||
|
|
||||||
## 付録:Tips
|
|
||||||
|
|
||||||
- リバースプロキシ(Nginx)を通して HTTPS 公開することで、ブラウザ互換性やセキュリティを向上できる
|
|
||||||
- Cloudflare などのCDNと組み合わせれば、簡易的なグローバル配信も可能
|
|
||||||
- アプリからは AWS SDK を使ってアクセス可能(S3互換)
|
|
||||||
|
|
||||||
---
|
|
||||||
|
|
||||||
## まとめ
|
|
||||||
|
|
||||||
MinIO は S3互換かつ軽量で、開発・検証・軽量サービスにおけるストレージニーズに柔軟に対応できる。Docker環境でも素早く構築可能なため、内部ツールやバックアップ用途として導入検討する価値がある。
|
|
||||||
@ -1,20 +0,0 @@
|
|||||||
const Minio = require('minio');
|
|
||||||
|
|
||||||
const minioClient = new Minio.Client({
|
|
||||||
endPoint: 'localhost',
|
|
||||||
port: 9000,
|
|
||||||
useSSL: false,
|
|
||||||
accessKey: 'appuser',
|
|
||||||
secretKey: 'password123'
|
|
||||||
});
|
|
||||||
|
|
||||||
const BUCKET_NAME = 'sample-data';
|
|
||||||
const OBJECT_NAME = 'sample2.csv';
|
|
||||||
|
|
||||||
minioClient.removeObject(BUCKET_NAME, OBJECT_NAME, (err) => {
|
|
||||||
if (err) {
|
|
||||||
return console.log("file delete error:", err);
|
|
||||||
}
|
|
||||||
|
|
||||||
console.log('File deleted successfully.');
|
|
||||||
});
|
|
||||||
@ -1,19 +0,0 @@
|
|||||||
const Minio = require('minio');
|
|
||||||
|
|
||||||
const minioClient = new Minio.Client({
|
|
||||||
endPoint: 'localhost',
|
|
||||||
port: 9000,
|
|
||||||
useSSL: false,
|
|
||||||
accessKey: 'appuser',
|
|
||||||
secretKey: 'password123'
|
|
||||||
});
|
|
||||||
|
|
||||||
const BUCKET_NAME = 'sample-data';
|
|
||||||
const OBJECT_NAMES = ['file1.csv', 'file2.csv'];
|
|
||||||
minioClient.removeObjects(BUCKET_NAME, OBJECT_NAMES, (err) => {
|
|
||||||
if (err) {
|
|
||||||
return console.log("files delete error:", err);
|
|
||||||
}
|
|
||||||
console.log('Files deleted successfully.');
|
|
||||||
});
|
|
||||||
|
|
||||||
@ -1,35 +0,0 @@
|
|||||||
/**
|
|
||||||
* MinIOに保存されているファイル一覧を取得する
|
|
||||||
*/
|
|
||||||
const Minio = require('minio');
|
|
||||||
const fs = require('fs');
|
|
||||||
|
|
||||||
const minioClient = new Minio.Client({
|
|
||||||
endPoint: 'localhost',
|
|
||||||
port: 9000,
|
|
||||||
useSSL: false,
|
|
||||||
accessKey: 'appuser',
|
|
||||||
secretKey: 'password123'
|
|
||||||
});
|
|
||||||
const BUCKET_NAME = 'sample-data';
|
|
||||||
const OBJECT_NAME = 'sample1.csv';
|
|
||||||
|
|
||||||
minioClient.getObject(BUCKET_NAME, OBJECT_NAME, (err, dataStream) => {
|
|
||||||
if (err) {
|
|
||||||
return console.log("file get error:", err);
|
|
||||||
}
|
|
||||||
const file = fs.createWriteStream('./sample1_direct.csv');
|
|
||||||
dataStream.pipe(file);
|
|
||||||
console.log('File downloaded successfully.');
|
|
||||||
|
|
||||||
dataStream.on('end', () => {
|
|
||||||
console.log('File Download File end');
|
|
||||||
});
|
|
||||||
|
|
||||||
dataStream.on('error', err => {
|
|
||||||
console.error('File Download Err:', err);
|
|
||||||
});
|
|
||||||
|
|
||||||
|
|
||||||
|
|
||||||
});
|
|
||||||
@ -1,28 +0,0 @@
|
|||||||
/**
|
|
||||||
* MinIOに保存されているファイル一覧を取得する
|
|
||||||
*/
|
|
||||||
const Minio = require('minio');
|
|
||||||
|
|
||||||
const minioClient = new Minio.Client({
|
|
||||||
endPoint: 'localhost',
|
|
||||||
port: 9000,
|
|
||||||
useSSL: false,
|
|
||||||
accessKey: 'appuser',
|
|
||||||
secretKey: 'password123'
|
|
||||||
});
|
|
||||||
const BUCKET_NAME = 'sample-data';
|
|
||||||
|
|
||||||
// listObjects はストリームなので順に読み取る必要があります
|
|
||||||
const stream = minioClient.listObjects(BUCKET_NAME, '', true); // true: 再帰的にすべて取得
|
|
||||||
|
|
||||||
stream.on('data', obj => {
|
|
||||||
console.log(`data ${obj.name} (${obj.size} bytes)`);
|
|
||||||
});
|
|
||||||
|
|
||||||
stream.on('end', () => {
|
|
||||||
console.log('Get File list end');
|
|
||||||
});
|
|
||||||
|
|
||||||
stream.on('error', err => {
|
|
||||||
console.error('Files get Err:', err);
|
|
||||||
});
|
|
||||||
@ -1,27 +0,0 @@
|
|||||||
/**
|
|
||||||
* MinIOに保存されているファイル一覧を非同期関数で取得する
|
|
||||||
*/
|
|
||||||
const Minio = require('minio');
|
|
||||||
|
|
||||||
const minioClient = new Minio.Client({
|
|
||||||
endPoint: 'localhost',
|
|
||||||
port: 9000,
|
|
||||||
useSSL: false,
|
|
||||||
accessKey: 'appuser',
|
|
||||||
secretKey: 'password123'
|
|
||||||
});
|
|
||||||
const BUCKET_NAME = 'sample-data';
|
|
||||||
|
|
||||||
function listAllObjects(bucket) {
|
|
||||||
return new Promise((resolve, reject) => {
|
|
||||||
const result = [];
|
|
||||||
const stream = minioClient.listObjects(bucket, '', true);
|
|
||||||
|
|
||||||
stream.on('data', obj => result.push(obj));
|
|
||||||
stream.on('end', () => resolve(result));
|
|
||||||
stream.on('error', reject);
|
|
||||||
});
|
|
||||||
}
|
|
||||||
|
|
||||||
const objects = await listAllObjects(BUCKET_NAME);
|
|
||||||
console.log(objects.map(obj => obj.name));
|
|
||||||
@ -1,32 +0,0 @@
|
|||||||
const Minio = require('minio');
|
|
||||||
|
|
||||||
const BUCKET_NAME = 'sample-data';
|
|
||||||
|
|
||||||
const minioClient = new Minio.Client({
|
|
||||||
endPoint: 'localhost',
|
|
||||||
port: 9000,
|
|
||||||
useSSL: false,
|
|
||||||
accessKey: 'appuser',
|
|
||||||
secretKey: 'password123'
|
|
||||||
});
|
|
||||||
|
|
||||||
// presigned GET URL を生成(有効期限: 1時間)
|
|
||||||
minioClient.presignedGetObject(BUCKET_NAME, 'sample2.csv', 60 * 60, (err, url) => {
|
|
||||||
if (err) {
|
|
||||||
return console.log("file get signatureURL error:", err);
|
|
||||||
}
|
|
||||||
|
|
||||||
console.log('✅ Presigned GET URL:', url)
|
|
||||||
|
|
||||||
// fetchで取得してファイルに保存(任意)
|
|
||||||
// fetch(url)
|
|
||||||
// .then(res => res.buffer())
|
|
||||||
// .then(data => {
|
|
||||||
// // Bufferを使ってファイルに保存(オプション)
|
|
||||||
// import('fs').then(fs => {
|
|
||||||
// fs.writeFileSync('./downloaded_sample2.csv', data);
|
|
||||||
// console.log('File downloaded successfully.');
|
|
||||||
// });
|
|
||||||
// });
|
|
||||||
});
|
|
||||||
|
|
||||||
@ -1,22 +0,0 @@
|
|||||||
const Minio = require('minio');
|
|
||||||
|
|
||||||
const BUCKET_NAME = 'sample-data';
|
|
||||||
|
|
||||||
const minioClient = new Minio.Client({
|
|
||||||
endPoint: 'localhost',
|
|
||||||
port: 9000,
|
|
||||||
useSSL: false,
|
|
||||||
accessKey: 'appuser',
|
|
||||||
secretKey: 'password123'
|
|
||||||
});
|
|
||||||
|
|
||||||
// ファイルアップロード(src/data/sample1.csv)
|
|
||||||
minioClient.fPutObject(BUCKET_NAME, 'sample1.csv', './src/data/sample1.csv', function(err, etag) {
|
|
||||||
if (err){
|
|
||||||
return console.log("file upload error:", err);
|
|
||||||
}
|
|
||||||
console.log('File uploaded successfully.',etag);
|
|
||||||
});
|
|
||||||
|
|
||||||
|
|
||||||
|
|
||||||
@ -1,30 +0,0 @@
|
|||||||
const Minio = require('minio');
|
|
||||||
|
|
||||||
const BUCKET_NAME = 'sample-data';
|
|
||||||
|
|
||||||
const minioClient = new Minio.Client({
|
|
||||||
endPoint: 'localhost',
|
|
||||||
port: 9000,
|
|
||||||
useSSL: false,
|
|
||||||
accessKey: 'appuser',
|
|
||||||
secretKey: 'password123'
|
|
||||||
});
|
|
||||||
|
|
||||||
// ファイルアップロード(src/data/sample1.csv)
|
|
||||||
minioClient.presignedPutObject(BUCKET_NAME, 'sample2.csv',60 * 60, function(err, presignedUrl) {
|
|
||||||
if (err){
|
|
||||||
return console.log("file upload error:", err);
|
|
||||||
}
|
|
||||||
console.log('File uploaded URL:',presignedUrl);
|
|
||||||
// ダウンロードしたURLにPUTリクエストを送信する
|
|
||||||
});
|
|
||||||
|
|
||||||
// curl -X PUT -T .\src\data\sample2.csv "presignedUrl"
|
|
||||||
// const fileData = await fs.readFile(filePath);
|
|
||||||
// const res = await fetch(uploadUrl, {
|
|
||||||
// method: 'PUT',
|
|
||||||
// body: fileData,
|
|
||||||
// headers: {
|
|
||||||
// 'Content-Type': 'text/csv'
|
|
||||||
// }
|
|
||||||
// });
|
|
||||||
@ -1,89 +0,0 @@
|
|||||||
#!/usr/bin/env node
|
|
||||||
|
|
||||||
/**
|
|
||||||
* シンプルなコマンドラインスクリプト
|
|
||||||
*
|
|
||||||
* このスクリプトは、引数を受け取り、その内容を表示します。
|
|
||||||
* `--help` オプションを指定すると、使い方を表示します。
|
|
||||||
*
|
|
||||||
* @module script
|
|
||||||
*/
|
|
||||||
|
|
||||||
|
|
||||||
/**
|
|
||||||
* スクリプトのエントリーポイント
|
|
||||||
*
|
|
||||||
* @function main
|
|
||||||
* @param {string[]} args - コマンドライン引数 (process.argv を除いたもの)
|
|
||||||
* @returns {void}
|
|
||||||
*
|
|
||||||
* @example
|
|
||||||
* // メッセージを表示する
|
|
||||||
* node src/script/sampleScript.js Hello
|
|
||||||
*
|
|
||||||
* @example
|
|
||||||
* // ヘルプを表示する
|
|
||||||
* node src/script/sampleScript.js --help
|
|
||||||
*/
|
|
||||||
const main = (args) => {
|
|
||||||
if (args.includes('--help')) {
|
|
||||||
displayHelp();
|
|
||||||
return;
|
|
||||||
}
|
|
||||||
// 引数がない場合のデフォルトメッセージ
|
|
||||||
if (args.length === 0) {
|
|
||||||
handleError('エラー: 引数が必要です。\n`node script.js --help` で使い方を確認してください。');
|
|
||||||
return;
|
|
||||||
}
|
|
||||||
processArguments(args);
|
|
||||||
}
|
|
||||||
|
|
||||||
/**
|
|
||||||
* ヘルプメッセージを表示する
|
|
||||||
*
|
|
||||||
* @function displayHelp
|
|
||||||
* @returns {void}
|
|
||||||
*/
|
|
||||||
const displayHelp = () => {
|
|
||||||
console.log(`
|
|
||||||
Usage: node script.js [message]
|
|
||||||
|
|
||||||
Options:
|
|
||||||
--help ヘルプを表示
|
|
||||||
`);
|
|
||||||
};
|
|
||||||
|
|
||||||
|
|
||||||
/**
|
|
||||||
* エラーメッセージを表示し、終了する
|
|
||||||
*
|
|
||||||
* @function handleError
|
|
||||||
* @param {string} message - エラーメッセージ
|
|
||||||
* @returns {void}
|
|
||||||
*
|
|
||||||
* @example
|
|
||||||
* handleError("エラー: 引数が必要です。");
|
|
||||||
*/
|
|
||||||
const handleError = (message) => {
|
|
||||||
console.error(message);
|
|
||||||
process.exit(1);
|
|
||||||
}
|
|
||||||
|
|
||||||
/**
|
|
||||||
* 引数を処理してメッセージを表示する
|
|
||||||
*
|
|
||||||
* @function processArguments
|
|
||||||
* @param {string[]} args - コマンドライン引数
|
|
||||||
* @returns {void}
|
|
||||||
*
|
|
||||||
* @example
|
|
||||||
* processArguments(["Hello", "World"]);
|
|
||||||
* // 出力: "Hello World"
|
|
||||||
*/
|
|
||||||
function processArguments(args) {
|
|
||||||
const message = args.join(' ');
|
|
||||||
console.log(`入力されたメッセージ: ${message}`);
|
|
||||||
}
|
|
||||||
|
|
||||||
// コマンドライン引数を取得して main 関数を実行
|
|
||||||
main(process.argv.slice(2));
|
|
||||||
@ -1,32 +0,0 @@
|
|||||||
#!/usr/bin/env node
|
|
||||||
|
|
||||||
/**
|
|
||||||
* 処理を測定するスクリプト
|
|
||||||
*
|
|
||||||
* @module script
|
|
||||||
*/
|
|
||||||
|
|
||||||
/**
|
|
||||||
* TimeWatch クラス
|
|
||||||
*/
|
|
||||||
const TimeWatch = require('../classes/TimeWatch');
|
|
||||||
|
|
||||||
/**
|
|
||||||
* スクリプトのエントリーポイント
|
|
||||||
*
|
|
||||||
* @function main
|
|
||||||
* @returns {void}
|
|
||||||
*
|
|
||||||
* node src/script/timeWatchTest.js
|
|
||||||
*/
|
|
||||||
const main = () => {
|
|
||||||
const timeWatch = new TimeWatch();
|
|
||||||
timeWatch.start();
|
|
||||||
// 処理
|
|
||||||
for (let i = 0; i < 100000000; i++) {
|
|
||||||
// do nothing
|
|
||||||
}
|
|
||||||
timeWatch.stop();
|
|
||||||
timeWatch.printElapsedTime();
|
|
||||||
}
|
|
||||||
main();
|
|
||||||
@ -1,93 +0,0 @@
|
|||||||
const archiver = require('archiver');
|
|
||||||
const fs = require('fs');
|
|
||||||
const path = require('path');
|
|
||||||
|
|
||||||
/**
|
|
||||||
* サーバサイドで圧縮処理しフロントエンドにファイルコンテンツを返す
|
|
||||||
* @param {http.IncomingMessage} req
|
|
||||||
* @param {http.ServerResponse} res
|
|
||||||
* @returns {void}
|
|
||||||
*/
|
|
||||||
const downloadContents = (req, res) => {
|
|
||||||
|
|
||||||
// ファイルの圧縮処理
|
|
||||||
// CORSヘッダーを追加
|
|
||||||
res.setHeader('Access-Control-Allow-Origin', '*'); // すべてのオリジンを許可
|
|
||||||
res.setHeader('Access-Control-Allow-Methods', 'GET, POST, OPTIONS');
|
|
||||||
res.setHeader('Access-Control-Allow-Headers', 'Content-Type');
|
|
||||||
// CSVファイル対象
|
|
||||||
const csvFilePaths = [
|
|
||||||
"./src/front/assets/data/test_data_1.csv",
|
|
||||||
"./src/front/assets/data/test_data_2.csv"
|
|
||||||
]
|
|
||||||
res.setHeader('Content-Type', 'application/zip');
|
|
||||||
res.setHeader('Content-Disposition', 'attachment; filename=test.zip');
|
|
||||||
|
|
||||||
const archive = archiver('zip', { zlib: { level: 9 } });
|
|
||||||
|
|
||||||
archive.on('error', (err) => {
|
|
||||||
console.error('Archiver Error:', err);
|
|
||||||
res.statusCode = 500;
|
|
||||||
res.end('Internal Server Error');
|
|
||||||
});
|
|
||||||
|
|
||||||
// レスポンスに直接圧縮データを送る
|
|
||||||
archive.pipe(res);
|
|
||||||
|
|
||||||
// ZIPにファイルを追加
|
|
||||||
csvFilePaths.forEach((filePath) => {
|
|
||||||
if (fs.existsSync(filePath)) {
|
|
||||||
archive.append(fs.createReadStream(filePath), { name: path.basename(filePath) });
|
|
||||||
} else {
|
|
||||||
console.warn(`File not found: ${filePath}`);
|
|
||||||
}
|
|
||||||
});
|
|
||||||
// ZIPファイルを作成
|
|
||||||
archive.finalize();
|
|
||||||
}
|
|
||||||
|
|
||||||
/**
|
|
||||||
* generateZipUrl
|
|
||||||
*
|
|
||||||
* @param {http.IncomingMessage} req
|
|
||||||
* @param {http.ServerResponse} res
|
|
||||||
*/
|
|
||||||
const generateZipUrl = (req, res) => {
|
|
||||||
// CORSヘッダーを追加
|
|
||||||
res.setHeader('Access-Control-Allow-Origin', '*'); // すべてのオリジンを許可
|
|
||||||
res.setHeader('Access-Control-Allow-Methods', 'GET, POST, OPTIONS');
|
|
||||||
res.setHeader('Access-Control-Allow-Headers', 'Content-Type');
|
|
||||||
res.setHeader('Content-Type', 'application/json');
|
|
||||||
// CSVファイル対象
|
|
||||||
const csvFilePaths = [
|
|
||||||
"./src/front/assets/data/test_data_1.csv",
|
|
||||||
"./src/front/assets/data/test_data_2.csv"
|
|
||||||
]
|
|
||||||
// ZIPファイルを生成してファイルを保存する
|
|
||||||
const archive = archiver('zip', { zlib: { level: 9 } });
|
|
||||||
const zipFilePath = './src/front/assets/data/test.zip';
|
|
||||||
const output = fs.createWriteStream(zipFilePath);
|
|
||||||
archive.pipe(output);
|
|
||||||
|
|
||||||
// ZIPにファイルを追加
|
|
||||||
csvFilePaths.forEach((filePath) => {
|
|
||||||
if (fs.existsSync(filePath)) {
|
|
||||||
archive.append(fs.createReadStream(filePath), { name: path.basename(filePath) });
|
|
||||||
} else {
|
|
||||||
console.warn(`File not found: ${filePath}`);
|
|
||||||
}
|
|
||||||
});
|
|
||||||
|
|
||||||
// ZIPファイルを作成
|
|
||||||
archive.finalize();
|
|
||||||
|
|
||||||
// レスポンスにはURLを返す(~/assets/data/test.zip)
|
|
||||||
const url = `assets/data/test.zip`;
|
|
||||||
res.end(JSON.stringify({ url: url }));
|
|
||||||
}
|
|
||||||
|
|
||||||
|
|
||||||
module.exports = {
|
|
||||||
downloadContents,
|
|
||||||
generateZipUrl
|
|
||||||
};
|
|
||||||
@ -1,46 +0,0 @@
|
|||||||
/**
|
|
||||||
* @fileoverview Google Cloud Storage (GCS) download module.
|
|
||||||
*/
|
|
||||||
const { Storage } = require('@google-cloud/storage');
|
|
||||||
const archiver = require('archiver');
|
|
||||||
const KEY_FILE_PATH = './keys/service-account.json'
|
|
||||||
const storage = new Storage({
|
|
||||||
keyFilename: KEY_FILE_PATH});
|
|
||||||
|
|
||||||
// Load environment variables
|
|
||||||
require('dotenv').config();
|
|
||||||
|
|
||||||
// バケット名を.envから取得する
|
|
||||||
const BUCKET_NAME = process.env.BUCKET_NAME;
|
|
||||||
console.log(`BUCKET_NAME: ${BUCKET_NAME}`);
|
|
||||||
|
|
||||||
|
|
||||||
/**
|
|
||||||
* GCStorageからファイルをダウンロードする
|
|
||||||
*
|
|
||||||
* @param {http.IncomingMessage} req
|
|
||||||
* @param {http.ServerResponse} res
|
|
||||||
*/
|
|
||||||
const downloadFilesFromGCS = async (req, res) => {
|
|
||||||
// バケットからファイル一覧を取得する
|
|
||||||
const [files] = await storage.bucket(BUCKET_NAME).getFiles();
|
|
||||||
const filesToZip = files.map((file) => file.name);
|
|
||||||
|
|
||||||
res.setHeader('Content-Disposition', 'attachment; filename="files.zip"');
|
|
||||||
res.setHeader('Content-Type', 'application/zip');
|
|
||||||
|
|
||||||
const archive = archiver('zip', { zlib: { level: 9 } });
|
|
||||||
|
|
||||||
archive.on('error', (err) => res.status(500).send({ error: err.message }));
|
|
||||||
archive.pipe(res);
|
|
||||||
|
|
||||||
|
|
||||||
for (const fileName of filesToZip) {
|
|
||||||
const file = storage.bucket(BUCKET_NAME).file(fileName);
|
|
||||||
archive.append(file.createReadStream(), { name: fileName });
|
|
||||||
}
|
|
||||||
archive.finalize();
|
|
||||||
};
|
|
||||||
|
|
||||||
|
|
||||||
module.exports = downloadFilesFromGCS;
|
|
||||||
@ -1,39 +0,0 @@
|
|||||||
const http = require('http');
|
|
||||||
|
|
||||||
const { downloadContents, generateZipUrl } = require('./download/download');
|
|
||||||
const downloadFilesFromGCS = require('./download/gcsArchive');
|
|
||||||
|
|
||||||
|
|
||||||
|
|
||||||
/**
|
|
||||||
* Create a new HTTP server
|
|
||||||
*/
|
|
||||||
const server = http.createServer((req, res) => {
|
|
||||||
// Set the response HTTP header with HTTP status and Content type
|
|
||||||
// root path
|
|
||||||
if (req.url === '/') {
|
|
||||||
res.statusCode = 200;
|
|
||||||
res.setHeader('Content-Type', 'text/plain');
|
|
||||||
res.end('Hello World\n');
|
|
||||||
} else if (req.url === '/downdload') {
|
|
||||||
// ZIPファイルのコンテンツをそのまま返す
|
|
||||||
downloadContents(req, res);
|
|
||||||
} else if (req.url === '/generate-zip') {
|
|
||||||
// ZIPファイルの生成してストレージのURLを返す
|
|
||||||
generateZipUrl(req, res);
|
|
||||||
} else if (req.url === '/downdload-gcs') {
|
|
||||||
// GCSからZIPファイルのコンテンツをそのまま返す
|
|
||||||
downloadFilesFromGCS(req, res);
|
|
||||||
} else {
|
|
||||||
res.statusCode = 404;
|
|
||||||
res.setHeader('Content-Type', 'text/plain');
|
|
||||||
res.end('Not Found\n');
|
|
||||||
}
|
|
||||||
});
|
|
||||||
|
|
||||||
const port = 3000;
|
|
||||||
server.listen(port, () => {
|
|
||||||
console.log(`Server running at http://localhost:${port}/`);
|
|
||||||
});
|
|
||||||
|
|
||||||
|
|
||||||
75
src/types/IStorage.d.ts
vendored
75
src/types/IStorage.d.ts
vendored
@ -1,75 +0,0 @@
|
|||||||
/**
|
|
||||||
* 汎用的なクラウドストレージインターフェース(S3 / GCS / MinIO など対応)
|
|
||||||
*/
|
|
||||||
export enum ProcessType {
|
|
||||||
GET = 0,
|
|
||||||
PUT = 1
|
|
||||||
}
|
|
||||||
|
|
||||||
export interface IStorage {
|
|
||||||
/**
|
|
||||||
* ローカルファイルをアップロードする
|
|
||||||
* @param filePath ローカルファイルのパス
|
|
||||||
* @param objectKey ストレージ上でのオブジェクトキー(パス)
|
|
||||||
*/
|
|
||||||
uploadFile: (filePath: string, objectKey: string) => Promise<void>;
|
|
||||||
|
|
||||||
/**
|
|
||||||
* メモリ上のデータをアップロードする(バッファまたは文字列)
|
|
||||||
* @param fileData アップロード対象のデータ
|
|
||||||
* @param objectKey オブジェクトキー
|
|
||||||
* @param contentType Content-Type(省略時は application/octet-stream)
|
|
||||||
*/
|
|
||||||
uploadContents?: (
|
|
||||||
fileData: Buffer | string,
|
|
||||||
objectKey: string,
|
|
||||||
contentType?: string
|
|
||||||
) => Promise<void>;
|
|
||||||
|
|
||||||
/**
|
|
||||||
* ファイルをローカルにダウンロードする
|
|
||||||
* @param objectKey 取得するオブジェクトキー
|
|
||||||
* @param destinationPath 保存先ローカルファイルパス
|
|
||||||
* @returns ダウンロードしたファイルの内容(Buffer)
|
|
||||||
*/
|
|
||||||
downloadFile(objectKey: string, destinationPath: string): Promise<void>;
|
|
||||||
|
|
||||||
/**
|
|
||||||
* オブジェクトをメモリ上に直接取得する(ファイル保存しない)
|
|
||||||
* @param objectKey 取得するオブジェクトキー
|
|
||||||
* @returns オブジェクトの内容(Buffer)
|
|
||||||
*/
|
|
||||||
downloadContents?(objectKey: string): Promise<Buffer>;
|
|
||||||
|
|
||||||
/**
|
|
||||||
* 単一ファイル(オブジェクト)を削除する
|
|
||||||
* @param objectKey 削除するオブジェクトキー
|
|
||||||
*/
|
|
||||||
delete(objectKey: string): Promise<void>;
|
|
||||||
|
|
||||||
/**
|
|
||||||
* 複数のファイルをまとめて削除する(サポートされている場合)
|
|
||||||
* @param objectKeys 削除対象のオブジェクトキー配列
|
|
||||||
*/
|
|
||||||
deleteMany?(objectKeys: string[]): Promise<void>;
|
|
||||||
|
|
||||||
/**
|
|
||||||
* バケット内のファイル一覧を取得する
|
|
||||||
* @param prefix 指定したプレフィックスでフィルタリング(省略可)
|
|
||||||
* @returns 一致するオブジェクトキーの一覧
|
|
||||||
*/
|
|
||||||
getFileList(prefix?: string): Promise<string[]>;
|
|
||||||
|
|
||||||
/**
|
|
||||||
* 署名付きURLを発行する
|
|
||||||
* @param objectKey 対象のオブジェクトキー
|
|
||||||
* @param processType 処理タイプ(例: 0 = GET, 1 = PUT など)
|
|
||||||
* @param options 有効期限などのオプション
|
|
||||||
* @returns 署名付きURL
|
|
||||||
*/
|
|
||||||
getSignedUrl(
|
|
||||||
objectKey: string,
|
|
||||||
processType: ProcessType,
|
|
||||||
options: { expiresIn: number }
|
|
||||||
): Promise<string>;
|
|
||||||
}
|
|
||||||
Loading…
x
Reference in New Issue
Block a user